
Understanding Tent Vestibules: Your Gear’s Shield Against the Elements
A tent vestibule is an essential yet often underappreciated feature of modern camping shelters. This covered extension area sits outside the main tent body but remains protected by the rainfly, creating a buffer zone between the harsh outdoors and your cozy sleeping quarters. Vestibules serve as your first line of defense against weather elements while providing valuable storage space for gear that’s better kept outside your sleeping area.
Unlike the main tent body, vestibules typically lack a floor and offer less insulation, but their primary purpose isn’t comfort—it’s protection. These transitional spaces allow you to remove wet or muddy gear before entering the sleeping area, helping maintain a clean, dry interior. Most vestibules provide between 3-10 square feet (0.3-0.9 square meters) of covered area, though this varies significantly between tent models.
The concept of vestibules in tent design has evolved considerably over decades. Early backpacking tents often lacked this feature entirely, forcing campers to store gear either inside (reducing living space) or outside (exposing it to elements). Today, vestibules have become standard on quality tents, with some designs featuring multiple vestibules or expandable options for enhanced protection and storage.
Understanding the essential introduction to vestibule fundamentals helps campers make better use of their equipment. For those needing more clarity on exactly what a tent vestibule is and its various configurations, exploring dedicated resources can be valuable before purchasing your next tent.
How Vestibules Protect Against Different Weather Elements
Rain and Moisture Protection
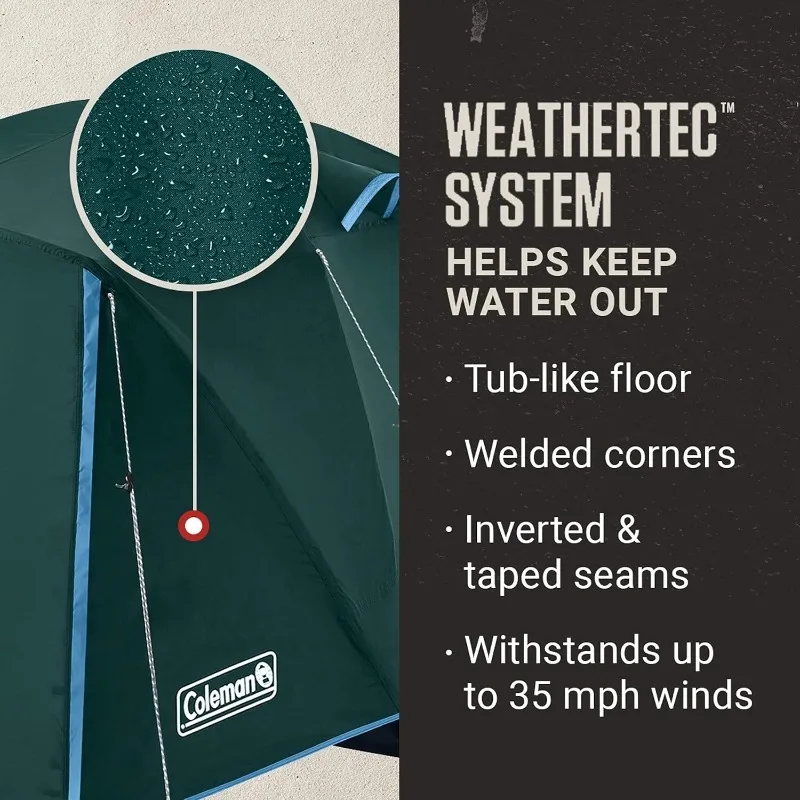
The primary function of a vestibule is protecting against precipitation. Most vestibules use the same waterproof material as the rainfly, typically offering hydrostatic head ratings between 1,500-3,000mm. This waterproofing, combined with taped seams and strategic design that channels water away from the tent entrance, creates an effective barrier against rain. The angled design helps shed water rather than collecting it, preventing pooling that could lead to leaks or structural stress.
Wind Resistance
Vestibules serve as effective windbreaks, reducing direct pressure on your tent body. When properly guyed out, vestibules can withstand significant wind forces, creating a more stable overall structure. The aerodynamic design of many vestibules helps deflect wind around the tent rather than allowing it to push directly against the main living space. This protection not only makes your tent more comfortable but also reduces strain on the tent poles and fabric, potentially extending its lifespan.
Snow Management
In winter camping scenarios, vestibules play a crucial role in snow management. Their sloped design helps shed snow accumulation, preventing dangerous weight buildup. Many four-season tents feature reinforced vestibules specifically engineered to handle snow loads. Additionally, the vestibule creates a transition area where you can brush off snow before entering the main tent, reducing moisture inside your sleeping area.
UV and Sun Protection
While often overlooked, vestibules provide valuable protection from harmful UV rays. Most tent materials incorporate UV-resistant treatments, and the vestibule extends this protection to your gear. In hot conditions, tests have shown temperature differences of 10-15°F (5.5-8.3°C) between items stored in vestibules versus those left in direct sunlight. This protection helps preserve equipment that might degrade under constant sun exposure.
Ground Moisture Barrier
Even floorless vestibules offer protection from ground moisture by creating a covered area where rain cannot directly hit the ground beneath. Some tent models include optional groundsheets that can extend into the vestibule area, creating a complete moisture barrier. This protection is especially valuable for gear that should remain dry but doesn’t need the premium space inside your sleeping area.
Understanding waterproof ratings for backpacking gear helps you better evaluate a vestibule’s protective capabilities. When evaluating tents, consider how these protections work together with the tent’s overall weather resistance and durability features for comprehensive protection.
Key Design Features That Enhance Weather Protection
The effectiveness of vestibule weather protection largely depends on specific design elements engineered to combat environmental challenges. Recognizing these features helps you maximize protection and make informed purchasing decisions.
Shape and Configuration
Vestibule shapes significantly impact weather resistance capabilities:
– A-frame vestibules provide excellent rain shedding but may struggle in high winds
– Dome-style vestibules offer superior wind resistance with more headroom
– Extended vestibules provide maximum storage but may require additional guylines for stability
– Wrap-around designs create multiple entry points and storage areas, distributing weather protection
Doors and Entry Points
Entry design directly impacts weather protection:
– Storm flaps on zippers prevent water penetration through closure points
– Multiple doors allow you to position entries away from prevailing wind/rain
– D-shaped doors provide larger openings while maintaining structural integrity
– Zipper guards and covered zippers prevent water seepage through these vulnerable points
Ventilation Systems
Strategic ventilation prevents condensation while maintaining protection:
– Adjustable vents allow customization based on conditions
– High-positioned vents release warm, moist air while keeping rain out
– Mesh panels provide air circulation without sacrificing protection
– Vestibule-specific venting separate from main tent ventilation
Support and Stability Features
Structural elements that enhance weather resistance:
– Multiple guyout points increase stability in high winds
– Reinforced stake loops prevent failure during storms
– Adjustable tension systems allow adaptation to changing conditions
– Connection points to main tent body that reduce flapping and potential stress tears
The difference between basic and advanced vestibule designs becomes particularly apparent in challenging weather. Mastering space with expanded vestibules allows campers to achieve an optimal balance between protection, storage, and livability. Browse our selection of camping tents with vestibules to see these design features implemented across different models.
Material Considerations for Effective Weather Protection
The materials used in vestibule construction fundamentally determine their weather protection capabilities. Understanding these materials helps you evaluate tent quality and durability.
Fabric Types and Properties
The primary fabrics used in vestibules each offer different protective qualities:
- Nylon provides excellent strength-to-weight ratio but may stretch when wet, potentially affecting weatherproofing. It typically dries quickly and offers good tear resistance.
- Polyester maintains more consistent tension when wet, providing more reliable weather protection in rainy conditions. It’s also more UV-resistant than nylon, extending the lifespan of tents in sunny environments.
- Ripstop patterns (available in both materials) incorporate reinforcement threads that prevent small tears from spreading, enhancing durability in rough conditions.
Waterproof Coatings and Treatments
Fabric alone isn’t waterproof—coatings provide this essential protection:
- Polyurethane (PU) coatings offer basic water resistance at lower cost
- Silicone coatings provide superior waterproofing and durability but at higher expense
- Dual-sided treatments (silicone outside, PU inside) offer balanced performance
- DWR (Durable Water Repellent) finishes enhance water beading and runoff
The waterproof rating, measured in millimeters of hydrostatic head, indicates how much water pressure the fabric can withstand before leaking. Most quality vestibules offer ratings between 1,500-3,000mm, sufficient for typical rainstorms.
Durability Factors
Material thickness, measured in denier (D), directly impacts durability and protection:
- Ultralight vestibules (15D-30D) minimize weight but require more careful handling
- Midweight options (40D-50D) balance durability and packability
- Heavy-duty materials (70D+) offer maximum protection in extreme conditions but add weight
Seam construction also plays a critical role, with taped or welded seams preventing water penetration at these vulnerable points.
Material quality directly impacts longevity—lower quality materials may only maintain peak performance for 2-3 seasons, while premium materials can deliver 7+ years of reliable protection with proper care.
For deeper insights into material longevity and performance, exploring the most durable tent materials helps inform purchasing decisions. Our selection of waterproof backpacking tents showcases various material combinations engineered for weather protection.
Best Practices for Maximizing Weather Protection
Even the best-designed vestibule requires proper setup and management to deliver optimal weather protection. These practical techniques help maximize your vestibule’s protective capabilities.
Proper Tensioning and Setup
– Establish even tension across all attachment points
– Adjust guylines to remove any sagging areas where water might pool
– Ensure the vestibule material is taut but not overstretched
– Position the vestibule opening away from prevailing winds when possibleStrategic Guyline Placement
– Use all provided attachment points in adverse conditions
– Position windward guylines at 45° angles for maximum stability
– Add extra guylines to reinforcement points during storm preparations
– Create triangulation patterns that distribute force evenlyGround Anchoring Techniques
– For sandy soil: Use wider stakes or bury regular stakes horizontally
– For rocky terrain: Use rock bags or natural anchors with cord
– For snow camping: Use snow stakes, buried items, or snow anchors
– For soft soil: Position stakes at 45° angles facing away from the tentWeather-Specific Adjustments
– During rain: Lower vestibule height to maximize runoff
– In high winds: Reduce vestibule profile by tightening all adjustments
– In snowy conditions: Regularly clear accumulation to prevent collapse
– In hot conditions: Maximize ventilation while maintaining coverageAnticipatory Preparations
– Check weather forecasts and adjust setup before conditions worsen
– Pre-place additional stakes and guylines before nightfall
– Test drainage patterns with water bottle during initial setup
– Create small trenches around vestibule perimeter in heavy rain scenarios
Maintaining 2-3 inches (5-8 cm) clearance between gear and vestibule walls prevents moisture transfer to your equipment when the fabric becomes wet. This simple practice significantly improves the protective value of your vestibule storage.
For comprehensive information on getting the most from your tent’s design features, our definitive guide to tent vestibule benefits provides detailed techniques. Browse our selection of backpacking tents with vestibules for models designed with these protection principles in mind.
Optimal Gear Organization Within Your Vestibule
Strategic organization within your vestibule dramatically improves weather protection for your gear. Thoughtful placement creates functional zones that maximize both space utilization and weather resistance.
Priority Items for Vestibule Storage
Certain items benefit most from vestibule placement:
– Boots, shoes, and footwear (keeps them accessible but protected)
– Wet rain gear and outerwear (prevents moisture transfer to sleeping area)
– Cooking equipment after cooling (protected but separate from sleeping area)
– Backpacks and daypacks (bulky but necessary items)
– Dirty or muddy gear (keeps main tent clean)
Creating Protective Zones
Organize your vestibule into distinct areas for optimal protection:
– Wet Zone: Nearest the entrance for wet items that need to dry
– Dry Zone: Deepest inside, most protected from wind-driven rain
– Transition Area: Central space for changing or gear access
For small vestibules (typical 3-5 square feet or 0.3-0.5 square meters), prioritize vertical organization using hooks or hanging systems to maximize limited floor space. Larger vestibules (7-10 square feet or 0.7-0.9 square meters) can accommodate more horizontal organization systems.
Layering Strategies
Layer items strategically for maximum protection:
1. Place least vulnerable items (closed plastic containers, waterproof bags) as outer barrier
2. Position waterproof gear as secondary protection layer
3. Keep moisture-sensitive equipment in center, elevated if possible
4. Use backpacks with rain covers as protective barriers for other gear
When expecting severe weather, consider using a waterproof ground cloth in the vestibule area and placing gear on lightweight packable platforms to elevate it slightly.
Detailed approaches to managing your equipment effectively can be found in our guide to mastering tent vestibule organization. For minimalist camping setups that require efficient storage solutions, explore our ultralight trekking pole tents with well-designed vestibule areas.
Safety Considerations When Using Vestibules
While vestibules provide excellent weather protection, they present specific safety challenges that require attention. Understanding these risks ensures you get protection benefits without compromising safety.
⚠️ Cooking Hazards
Cooking inside vestibules creates serious carbon monoxide and fire risks. Studies have documented numerous tent-related carbon monoxide poisonings from cooking in enclosed spaces. If you must cook near your tent:
– Maintain at least 3-4 feet (1-1.2 meters) distance from tent materials
– Ensure excellent ventilation with multiple open air paths
– Never leave stoves unattended
– Consider cooking shelters designed specifically for this purpose instead
⚠️ Ventilation Requirements
Inadequate ventilation can lead to dangerous condensation build-up, which reduces insulation effectiveness and can soak gear. Always:
– Leave partial ventilation even in cold or rainy conditions
– Adjust ventilation based on occupancy and weather
– Position gear to allow air circulation pathways
⚠️ Structural Limitations
Vestibules have weight and stress limitations that shouldn’t be exceeded:
– Avoid hanging heavy items from vestibule ceiling
– Clear snow accumulations regularly in winter conditions
– Don’t use vestibule support poles to hang or dry heavy gear
– Be aware that wind-loading can dramatically increase stress on attachment points
⚠️ Wildlife Considerations
Vestibules are not appropriate for food storage in areas with wildlife:
– Never store food in vestibules in bear country
– Use proper food storage containers placed away from your tent
– Be aware that cooking residue on gear can attract animals
⚠️ Emergency Access
In emergency situations, vestibule entries should not impede quick exit:
– Ensure zippers operate smoothly for quick access
– Keep exit paths clear of obstructive gear
– Consider orientation relative to escape routes when setting up
For extreme weather camping where safety margins are smaller, our selection of 4-season winter 2-person tents includes models with safety-oriented vestibule designs that balance protection with proper ventilation.
Comparing Vestibule Protection to Alternative Solutions
While vestibules offer excellent weather protection, understanding how they compare to alternatives helps you make appropriate choices for different conditions.
| Storage Method | Weather Protection | Weight Impact | Setup Complexity | Gear Access | Cost Factor |
|---|---|---|---|---|---|
| Vestibule Storage | Good overall protection, limited floor protection | Minimal (built-in) | Simple (integrated) | Very convenient | Included with tent |
| Inside Tent Storage | Maximum protection, condensation risk | None | None | Most convenient | Free but reduces living space |
| Outside Unprotected | No protection | None | None | Very convenient | Free but high risk |
| Separate Tarp Shelter | Customizable protection, requires skill | Moderate (1-2 lbs / 0.5-1 kg) | Moderate to complex | Less convenient | Low to moderate |
| Dedicated Gear Shed | Excellent protection, not portable | High (3+ lbs / 1.4+ kg) | Complex | Least convenient | High |
When Vestibules Excel:
– Weekend trips with moderate weather
– When balancing protection and weight is priority
– When quick setup/takedown matters
– For transitional spaces between indoors/outdoors
When Alternatives May Be Better:
– Extreme sustained precipitation (dedicated gear shed)
– Ultralight missions where every ounce matters (minimal outside storage)
– Base camping with valuable equipment (more robust solutions)
– Group camping with shared gear (larger communal protected areas)
Setup time comparisons also favor vestibules—they require virtually no additional setup time compared to 5-10 minutes for tarps or dedicated shelters. This efficiency becomes particularly valuable in deteriorating weather conditions when rapid protection is needed.
For more specific applications and use cases, our guide to understanding tent vestibules for backpacking and camping provides activity-specific recommendations.
How to Choose a Tent with Adequate Vestibule Weather Protection
Selecting a tent with appropriate vestibule protection requires matching features to your specific needs and conditions. This evaluation process helps prioritize what matters most for your camping style.
Evaluation Checklist for Vestibule Weather Protection
When assessing potential tents, consider:
- Size requirements: Calculate based on gear volume; typically 3-4 square feet (0.3-0.4 square meters) per person minimum
- Weather rating: Match to expected conditions (3-season vs. 4-season)
- Ventilation options: Look for adjustable vents that work in various conditions
- Entry configuration: Single vs. double vestibules for access and storage distribution
- Material quality: Higher denier numbers generally indicate better durability
- Waterproof rating: 1,500mm minimum, 2,000-3,000mm for reliable protection
- Pole structure: More attachment points generally mean better stability
- Adaptability: Features that allow configuration changes based on conditions
Activity-Specific Considerations
Different activities demand different vestibule features:
– Backpacking: Prioritize weight efficiency and compact design
– Car camping: Can accommodate larger, more feature-rich vestibules
– Winter camping: Need reinforced structures and snow-shedding designs
– Expedition use: Requires maximum durability and redundant protection systems
When balancing protection with other factors, remember that lightweight designs typically cost $50-150 more than standard options but save 1-2 pounds (0.5-1 kg) of carried weight. This trade-off may be worthwhile for those covering significant distances.
For specific tent recommendations with excellent vestibule storage, our guide to best tents with gear storage vestibules offers tested options. Our collection of winter camping tents provides options specifically designed for challenging conditions with enhanced vestibule protection.

Lightweight Backpacking Tent, Ultralight Backpacking Tent, Waterproof Backpacking Tent
$391.05 Select options This product has multiple variants. The options may be chosen on the product page
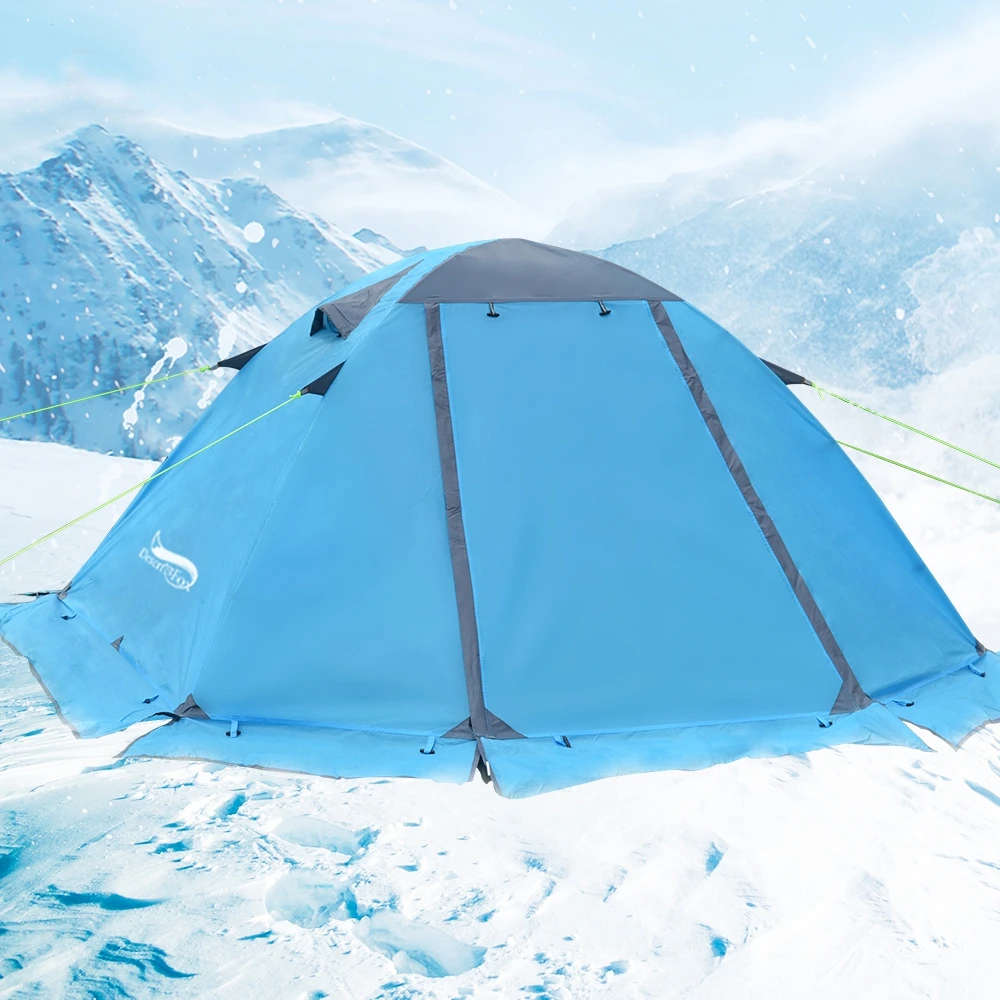
Heavy Duty 4 Season Tent, Mountaineering Tent, Winter Camping Tent
$870.40 Select options This product has multiple variants. The options may be chosen on the product page
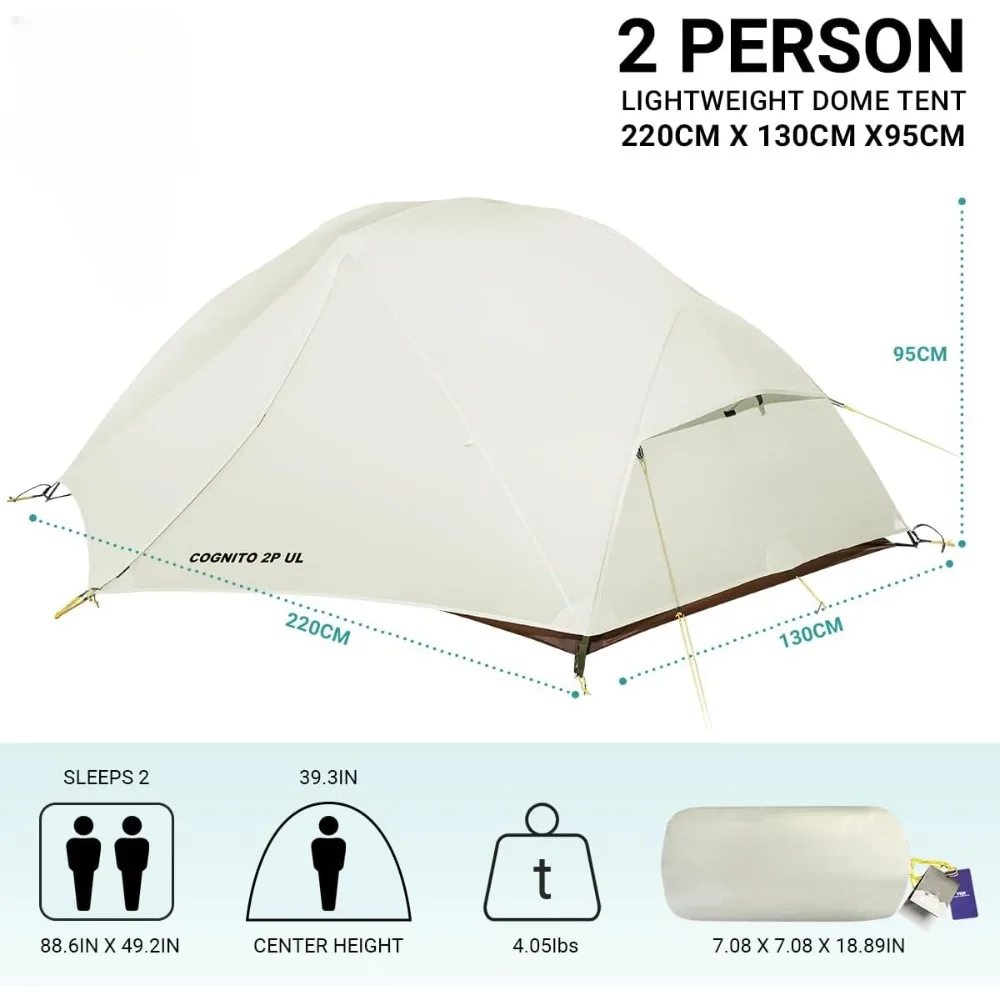
Ultralight Backpacking Tent, Ultralight Dome Tent, Winter Camping Tent
Price range: $369.63 through $370.07 Select options This product has multiple variants. The options may be chosen on the product page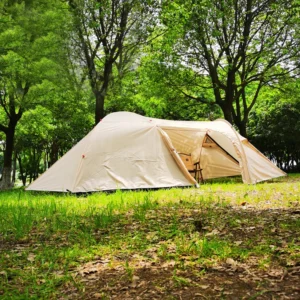
Camping Tent with Vestibule, Waterproof Camping Tent
Price range: $407.89 through $479.48 Select options This product has multiple variants. The options may be chosen on the product page
Heavy Duty 4 Season Tent, Ultralight Freestanding Tent, Winter Camping Tent
$3,722.66 Select options This product has multiple variants. The options may be chosen on the product page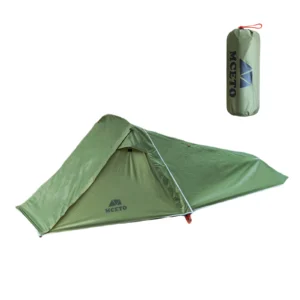
Backpacking Tent with Vestibule, Freestanding Backpacking Tent, Lightweight Backpacking Tent
Price range: $446.89 through $447.22 Select options This product has multiple variants. The options may be chosen on the product page
Advanced Weather Protection Techniques for Challenging Conditions
When facing extreme weather, standard vestibule setups might need enhancement. These specialized techniques help maximize protection when conditions deteriorate beyond the typical.
Extreme Rain Enhancement
- Create water diversion channels around vestibule perimeter
- Add waterproof groundsheet extensions that direct runoff away from entrance
- Position additional guylines at 45° angles to prevent water-collecting sag
- Deploy trekking poles as additional support points during heavy precipitation
- Consider supplementary “rain doors” (small tarps) over vestibule openings
High Wind Fortification
Properly secured vestibules can withstand sustained winds of 20-30 mph (32-48 km/h), with gusts up to 40 mph (64 km/h). Beyond these thresholds, consider:
– Deploying additional guylines in cross-pattern configurations
– Using heavy-duty stakes or natural anchors for critical attachment points
– Reducing vestibule height to create more aerodynamic profile
– Adding windbreak enhancements (natural features or portable windscreens)
– Orienting vestibule opening away from prevailing winds
Winter Camping Adaptations
- Clear snow buildups regularly to prevent dangerous loading
- Create snow walls as windbreaks around vestibule perimeter
- Use snow stakes or buried objects as secure anchors
- Consider vestibule extension kits for additional protected space
- Implement elevated platforms inside vestibule to keep gear above snow melt
Condensation Management
Proper vestibule ventilation can reduce condensation by 40-60% compared to fully closed configurations. Enhance this with:
– Cross-ventilation configurations using multiple vents
– Moisture-absorbing packets placed strategically inside vestibule
– Gear placement that doesn’t block air circulation paths
– Evening ventilation routines to release accumulated moisture
The most effective snow tent ventilation and condensation control strategies integrate multiple approaches simultaneously, particularly in challenging conditions that push equipment to its limits.
Is Vestibule Storage Completely Weatherproof?
Despite their protective benefits, vestibules have inherent limitations that every camper should understand. Recognizing these constraints helps set realistic expectations and implement appropriate safeguards.
Waterproofing Realities
Q: Will my gear stay completely dry in a vestibule during heavy rain?
A: Most vestibules provide excellent overhead protection but limited ground moisture protection. Items in direct contact with the ground may still absorb moisture. Water can also enter through open doorways or be driven by wind under the rainfly edges. Expect 80-90% protection, not 100%.
Wind Protection Limitations
Q: How much wind can a vestibule realistically handle?
A: Standard vestibules reliably protect against winds up to 15-25 mph (24-40 km/h). Beyond that, their effectiveness decreases significantly. In sustained high winds over 30-40 mph (48-64 km/h), even well-designed vestibules may flap excessively, potentially allowing moisture penetration or suffering damage.
Temperature Regulation Capabilities
Q: Do vestibules provide temperature protection?
A: Vestibules offer minimal insulation value. They typically maintain temperatures only 5-10°F (3-5.5°C) warmer than outside air. They primarily block wind and precipitation rather than providing thermal protection.
Durability Under Extended Conditions
Q: How long can I rely on vestibule protection during continuous bad weather?
A: Most vestibules perform well for 2-3 days of continuous precipitation or moderate wind. Beyond that timeframe, performance often degrades as materials saturate, tension loosens, or ground conditions deteriorate. Extended exposure typically requires maintenance adjustments and realistic expectations.
For conditions that exceed vestibule capabilities, consider supplemental protection or alternative arrangements. Remember that vestibules represent a compromise solution balancing protection, weight, and convenience—not an absolute guarantee against all elements.
The ways that vestibules can transform your living space go beyond just weather protection, making them valuable even when their protective limits are reached.
Frequently Asked Questions About Vestibule Weather Protection
Can electronics be safely stored in a vestibule?
Electronics should only be stored in vestibules inside waterproof cases or dry bags. While vestibules provide good overhead protection, they don’t guard against ground moisture or humidity. For valuable electronics, consider double-bagging or using silica gel packets inside waterproof containers for additional protection.
How do I prevent condensation inside my vestibule?
Prevent condensation by maintaining appropriate ventilation, even in cold or wet weather. Position gear away from vestibule walls (minimum 2-3 inches or 5-8 cm), avoid completely sealing the space, and consider using moisture-absorbing packets in extreme conditions. Morning condensation is normal and usually dissipates with increased temperature and ventilation.
Are vestibules necessary for summer camping?
While not strictly necessary for fair-weather summer camping, vestibules remain valuable for:
– Overnight rain protection
– Morning dew protection
– Creating shade for gear
– Keeping shoes and cooking equipment outside the sleeping area
– Providing privacy during clothes changes
What’s the best way to dry wet gear in a vestibule?
Create maximum airflow by opening vents and doors when weather permits. Hang items from vestibule ceiling using lightweight cord rather than laying them on the ground. Space items to allow air circulation between them, and rotate periodically to ensure even drying. For critical items, body heat inside the main tent will dry gear faster than vestibule storage.
How much snow accumulation can a vestibule handle?
This varies significantly by design. Basic three-season vestibules may handle only 1-2 inches (2.5-5 cm) before requiring clearing, while specialized four-season designs can support 4-6 inches (10-15 cm) of fresh snow. Always clear accumulation regularly rather than testing limits, as wet snow is significantly heavier than powder.
Can I add a vestibule to my existing tent?
Many tent manufacturers offer add-on vestibules that connect to compatible models. Universal aftermarket vestibules are also available but often provide less integrated protection than manufacturer-specific options. Look for attachment methods compatible with your tent’s design and ensure the materials offer comparable weather resistance.