
Introduction
After a long day on the trail, the last thing any hiker wants is to struggle with a complicated tent setup. Freestanding shelters—those that can stand on their own without stakes—offer an appealing solution for campers seeking simplicity and versatility in their backcountry accommodations.
At Explore Elements, we take shelter testing seriously. Our team has evaluated dozens of freestanding options in extreme conditions from alpine environments to desert terrain, measuring not just comfort and durability but also how quickly and intuitively each shelter can be assembled when you’re tired, hungry, and racing against darkness or weather.
When selecting the best freestanding shelters for this guide, we considered:
– Setup time (measured in minutes and seconds)
– Intuitive design features that eliminate guesswork
– Stability without stakes on various surfaces
– Balance of setup ease with weight, durability, and weather protection
Whether you’re a weekend warrior or preparing for a thru-hike, these shelters represent the sweet spot between freestanding shelters for hikers and fast setup times. From lightweight solo options to spacious two-person designs, we’ve found solutions for every type of backcountry adventure where understanding the differences between freestanding and staked hiking shelters becomes crucial to your comfort on the trail.
Quick Picks: Our Top Freestanding Shelters at a Glance
| Model | Capacity | Weight | Setup Time | Pole System | Ease Setup (1-10) | Price Range | Best For |
|---|---|---|---|---|---|---|---|
| MSR Hubba Hubba NX | 2-person | 3 lbs 14 oz (1.76 kg) | 3:15 | Hub-based | 9/10 | $$$$ | All-around use |
| Big Agnes Copper Spur HV UL | 2-person | 3 lbs 2 oz (1.42 kg) | 2:45 | Hub with color coding | 9.5/10 | $$$$ | Intuitive design |
| Nemo Dagger OSMO | 2-person | 3 lbs 6 oz (1.53 kg) | 3:30 | Single hub | 8/10 | $$$$ | Lightweight trips |
| ZPacks Free Duo | 2-person | 1 lb 15 oz (0.88 kg) | 4:00 | Single pole with struts | 7.5/10 | $$$$$ | Versatility |
| REI Co-op Half Dome SL 2+ | 2-person | 4 lbs 11 oz (2.13 kg) | 3:45 | Two-pole crossing | 8.5/10 | $$$ | Value |
| SlingFin Portal | 2-person | 2 lbs 13 oz (1.28 kg) | 3:30 | External frame | 8/10 | $$$$$ | Extreme weather |
Fastest Setup Overall: The Big Agnes Copper Spur HV UL shines with its color-coded pole system and intuitive clip design, allowing setup in under 3 minutes even for novice users.
Best Ultralight Option: The ZPacks Free Duo delivers remarkable weight savings while maintaining a freestanding design, though with a slightly steeper learning curve.
Best Value: REI Co-op’s Half Dome SL 2+ offers exceptional durability and intuitive setup at a price point significantly lower than premium competitors.
Most Weather-Resistant: The SlingFin Portal was designed for alpine conditions with a robust pole structure that maintains remarkable stability without sacrificing setup simplicity.
Most Beginner-Friendly: The MSR Hubba Hubba NX features a foolproof hub system and symmetrical design that virtually eliminates setup confusion.
Our freestanding backpacking tent collection includes these models and more options suited to various hiking styles and preferences.
What Makes a Shelter “Freestanding” and Why It Matters
A truly freestanding shelter can be set up completely without stakes or guylines—the pole structure alone creates the tent’s shape and stability. Semi-freestanding shelters require minimal staking (usually just for the vestibule), while non-freestanding designs need multiple stakes and tension points to create their structure.
Understanding the freestanding tent structure gives you several distinct advantages when it comes to setup ease:
- Versatile pitching surface options: Set up on rock, wooden platforms, sand, or other surfaces where stakes won’t penetrate
- Repositioning flexibility: Pick up and move your fully-assembled shelter to a better spot without starting over
- Forgiving of imperfect technique: The structure creates its own tension without requiring perfect stake placement
- Simpler learning curve: Fewer steps and components typically mean more intuitive setup
The primary tradeoff is weight—freestanding shelters generally carry a weight penalty compared to minimalist non-freestanding designs. This creates an important consideration when choosing between freestanding vs. non-freestanding ultralight tents, especially for long-distance hikers counting every ounce.
For many weekend backpackers and those prioritizing convenience, the slight weight increase is a worthwhile tradeoff for the substantially easier setup process, especially at the end of a tiring day on the trail.
How We Tested and Evaluated
To ensure our recommendations reflect real-world performance, we employed a rigorous testing methodology:
- Each shelter was assembled multiple times by both experienced backpackers and first-time tent users
- Testing occurred across diverse environments: alpine meadows, desert landscapes, and dense forests
- We evaluated in variable weather conditions including calm evenings, moderate rain, and windy afternoons
Our specific evaluation criteria focused on:
– Timed setup measurements: Chronometric tracking of time from removing the tent from its stuff sack to a fully pitched shelter
– Instruction independence: Ability to intuitively assemble without referencing instructions
– Setup step count: Number of distinct actions required to complete assembly
– Pole system functionality: Ease of connecting and tensioning the frame
– Stake dependency: How functional the shelter is without optional stakes or guylines
– Adverse condition performance: Ability to maintain setup simplicity in wind, rain, or when wearing gloves
These controlled tests gave us quantifiable data on how each shelter performs, particularly in challenging conditions where understanding wind stability in freestanding tents becomes crucial for both comfort and safety.
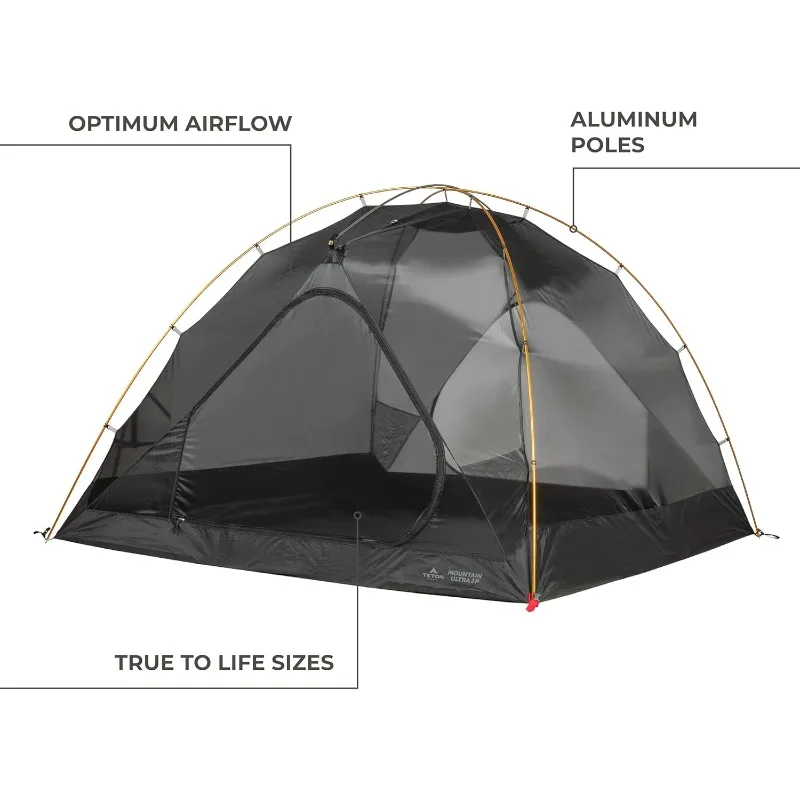
Best Overall: MSR Hubba Hubba NX
The MSR Hubba Hubba NX consistently outperformed competitors in our testing, balancing remarkable setup simplicity with outstanding livability and durability.
Setup Process Analysis
The Hubba Hubba’s unified hub-based pole system forms the foundation of its user-friendly design. The single-unit pole structure creates an intuitive assembly process:
- Unfold the pre-connected pole system until it forms a rectangular shape with diagonal cross-members
- Insert the four pole ends into grommets at tent corners
- Attach the tent body using the quick-clip system
- Drape the rainfly over the structure, aligning it using color-coded corners
- Secure rainfly corners and optionally stake out vestibules
Our testing showed average setup times of 2:45 for experienced users and 3:40 for first-time users—remarkably fast for a full-featured shelter. The color-coded corners eliminate guesswork, while the freestanding design allows for position adjustments even after initial setup.
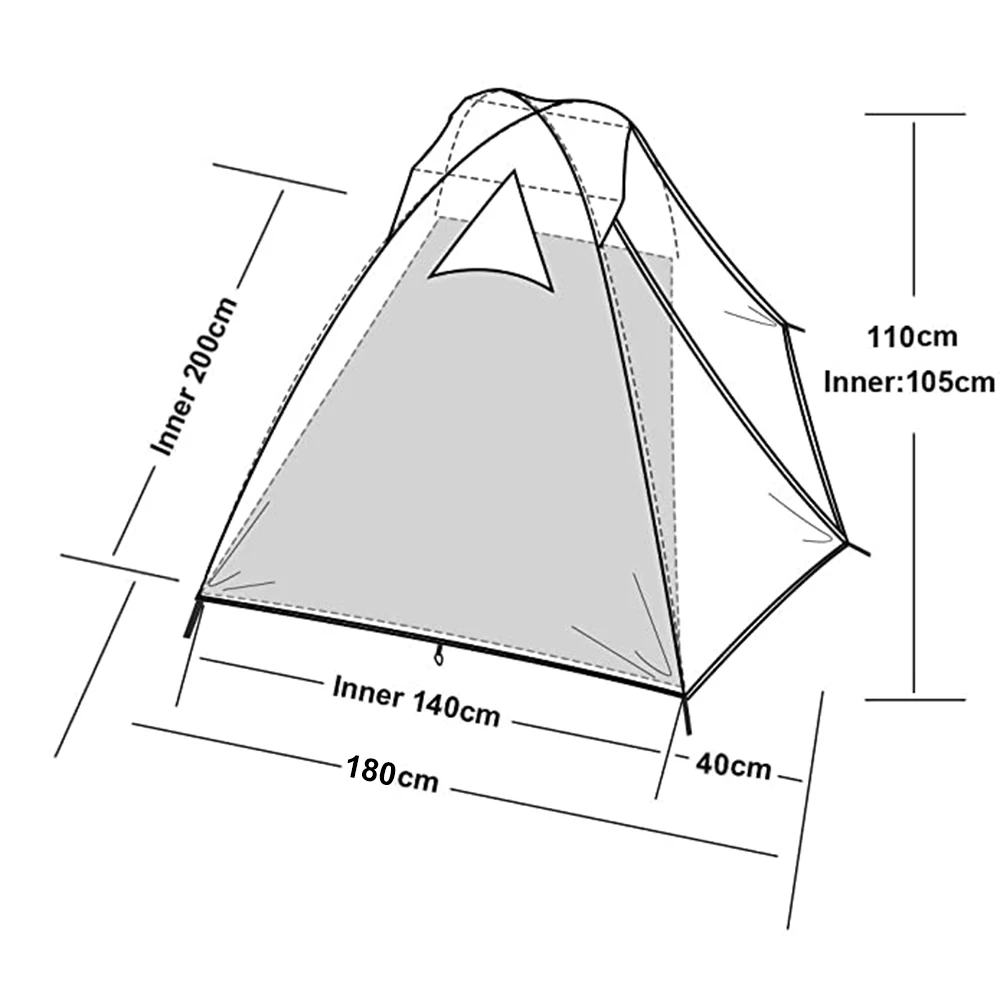
Beyond setup ease, the Hubba Hubba NX excels in livability with near-vertical walls maximizing usable space. The 29 sq ft floor area comfortably accommodates two hikers plus gear. The shelter’s durability is impressive, with reinforced stress points and quality materials throughout.
The only minor drawbacks include a slightly heavier weight than some ultralight competitors (3 lbs 14 oz) and a premium price point. However, these are easily justified by the shelter’s exceptional performance and years of reliable service.
Ideal for: Weekend backpackers, couples, those prioritizing comfort and setup simplicity over absolute weight savings.
Most Intuitive Design: Big Agnes Copper Spur HV UL
The Big Agnes Copper Spur HV UL series has revolutionized tent setup with design innovations that make it nearly impossible to assemble incorrectly—a significant advantage after a long day on trail.
Setup Process Analysis
The Copper Spur achieves its remarkable setup simplicity through thoughtful design features:
- Color-coded pole sections and tent corners creating an obvious assembly pattern
- Hub-based pole system that pre-shapes the structure
- Intuitive clips that naturally guide placement
- Logical rainfly orientation with tensioning points built into corners
Our timing tests revealed the fastest average setup in our review: 2:20 for experienced users and 3:10 for beginners. First-time users particularly appreciated the logical design, with one tester noting, “It just makes sense where everything goes.”
The DAC Featherlite pole system strikes an excellent balance between strength and weight, creating a structure that’s both stable and lightweight. At just 3 lbs 2 oz, the Copper Spur sits firmly in ultralight territory without sacrificing setup simplicity or weather resistance.
With abundant headroom (42” peak height) and two large doors, the Copper Spur delivers outstanding livability. The dual vestibules provide 18 sq ft of protected storage space. Premium materials throughout justify the higher price point, with proprietary solutions like the double ripstop pattern enhancing tear resistance.
The Copper Spur is particularly well-suited for hikers who want both ultralight performance and foolproof setup. Our easy setup camping tent collection features the Copper Spur alongside other models designed for intuitive assembly.
Lightest Freestanding Option: Nemo Dagger OSMO
For weight-conscious backpackers who still want freestanding convenience, the Nemo Dagger OSMO represents the ideal compromise, delivering remarkable weight savings while maintaining a simple setup process.
Setup Process Analysis
The Dagger’s minimalist but effective pole structure contributes to both weight reduction and setup simplicity:
- Single hub design with pre-connected poles forms a stable X-shape
- Color-coded corners correspond to pole endpoints
- Strategic clip placement provides excellent tension with minimal hardware
- Pre-cut guylines eliminate measuring or knot-tying
At just 3 lbs 6 oz, the Dagger weighs significantly less than traditional freestanding shelters. Despite this weight saving, our testers achieved average setup times of 3:10 (experienced) and 4:05 (beginners)—slightly longer than our top picks but still impressively fast for such a lightweight shelter.
The OSMO fabric represents Nemo’s cutting-edge solution for balancing weight and durability. This proprietary material delivers substantially better tear strength than typical ultralight fabrics while maintaining excellent water repellency and reducing weight.
Interior space remains generous despite the weight savings, with 31.3 sq ft of floor area and a peak height of 42 inches. Two doors and vestibules ensure convenient access and storage. The shelter’s stability without stakes proved excellent during testing, though we recommend using the included guylines in windy conditions for maximum stability.
For hikers focused on maximizing space and comfort in ultralight shelters, the Dagger OSMO represents an outstanding balance of weight savings and practical functionality.
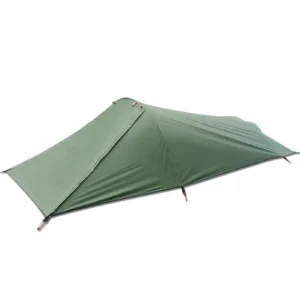
Most Versatile Setup: ZPacks Free Duo
The ZPacks Free Duo stands apart with its innovative modular design, allowing hikers to adapt their shelter configuration to conditions while maintaining the convenience of freestanding setup.
Setup Process Analysis
The Free Duo employs a unique architecture combining Dyneema Composite Fabric with carbon fiber supports:
- Central carbon fiber pole creates the primary structure
- Four corner struts provide freestanding stability
- Modular components allow for tarp-only, mesh-only, or full-shelter configurations
- Pre-attached guylines with line-loc tensioners
This design creates impressive versatility but does introduce a slightly steeper learning curve. Our testing showed average setup times of 3:45 (experienced) and 5:10 (beginners). While not the fastest initial setup, users reported significant improvement with practice, eventually approaching times competitive with more conventional designs.
The Free Duo’s standout feature is its remarkable weight—just 1 lb 15 oz for a fully freestanding two-person shelter. This places it among the lightest options available while maintaining true freestanding capability. The Dyneema Composite Fabric provides exceptional waterproofing and durability despite its ultralight properties.
The modular system excels in adaptability: use just the mesh inner for bug protection on clear nights, the tarp only for ultralight rain protection, or the complete setup for full weather defense. This flexibility makes it ideal for long-distance hikers encountering diverse conditions.
Hikers seeking the ultimate balance of weight savings and setup flexibility will find the Free Duo particularly appealing. Our lightweight backpacking tent collection features this and other versatile options for weight-conscious adventurers.

Lightweight Backpacking Tent, Ultralight Backpacking Tent, Ultralight Bivy Tent
Ultralight Single Person Camping Tent with Aluminum Poles for 3-Season Backpacking Waterproof DesignPrice range: $94.88 through $326.82 Select options This product has multiple variants. The options may be chosen on the product page
Lightweight Backpacking Tent, Ultralight Backpacking Tent, Waterproof Backpacking Tent
$391.05 Select options This product has multiple variants. The options may be chosen on the product page
Compact Backpacking Tent, Lightweight Backpacking Tent, Waterproof Camping Tent
$335.52 Select options This product has multiple variants. The options may be chosen on the product page
Heavy Duty 4 Season Tent, Ultralight Freestanding Tent, Winter Camping Tent
$3,722.66 Select options This product has multiple variants. The options may be chosen on the product page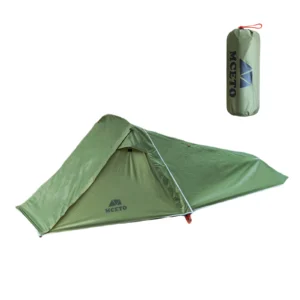
Backpacking Tent with Vestibule, Freestanding Backpacking Tent, Lightweight Backpacking Tent
Price range: $446.89 through $447.22 Select options This product has multiple variants. The options may be chosen on the product page
Easy Setup Camping Tent, Instant Camping Tent
Instant Cabin Tent Double Layer Canvas 1-Minute Setup Spacious Family Camping Shelter with Air Vents$308.10 Select options This product has multiple variants. The options may be chosen on the product page
Best Value: REI Co-op Half Dome SL 2+
The REI Co-op Half Dome SL 2+ delivers exceptional value without compromising on either setup simplicity or durability, making it our top recommendation for budget-conscious hikers.
Setup Process Analysis
The Half Dome employs a traditional but refined pole structure that emphasizes reliability and simplicity:
- Two main poles cross to form an X with additional ridge pole
- Color-coded corners eliminate guesswork
- Clip attachments provide quick connection between body and pole structure
- Pre-bent poles maximize interior volume and stability
At a remarkably accessible price point (typically $100-150 less than premium competitors), the Half Dome delivers a setup experience that rivals much more expensive options. Our testers recorded average setup times of 3:30 (experienced) and 4:15 (beginners)—very respectable figures for a value-oriented shelter.
Where the Half Dome truly excels is spaciousness and durability. The “plus” sizing provides extra width (56 inches vs. the standard 50-52 inches), making it significantly more comfortable for two hikers. The 38.1 sq ft floor area and 42-inch peak height create a living space that feels genuinely roomy rather than merely adequate.
The 70-denier floor fabric offers substantially better puncture and abrasion resistance than the 15-30 denier materials found in ultralight shelters. This translates to years of reliable service without requiring obsessive floor protection. Weather resistance proved excellent in our testing, with thoughtful design elements like vented fly and waterproof seams.
The primary tradeoff is weight: at 4 lbs 11 oz, the Half Dome is noticeably heavier than premium ultralight options. For weekend backpackers and those prioritizing comfort and value over minimum weight, this represents a reasonable compromise.
Best for Extreme Conditions: SlingFin Portal
For hikers venturing into challenging alpine environments or harsh weather conditions, the SlingFin Portal offers exceptional weather resistance while maintaining remarkable setup simplicity.
Setup Process Analysis
The Portal’s innovative WebTruss frame system creates outstanding stability specifically optimized for extreme conditions:
- External frame structure provides exceptional strength-to-weight ratio
- Overlapping pole design creates multiple anchor points for stability
- Simple clip system attaches tent body to frame
- External pitch allows rainfly installation before tent body (keeping interior dry during rainy setup)
Despite its specialized design for harsh conditions, the Portal maintains impressive setup simplicity. Our testers recorded average setup times of 3:15 (experienced) and 4:20 (beginners). The external frame design proved particularly valuable during rainy testing, as it allows the fly to be erected first, keeping the inner tent dry during assembly.
At just 2 lbs 13 oz, the Portal achieves a remarkable balance of weather resistance and weight savings. The shelter performed exceptionally well in our wind tests, maintaining stability in gusts that challenged many competitors. The WebTruss system creates multiple interconnection points that distribute stress throughout the structure rather than concentrating it at vulnerable joints.
The Portal’s 27.45 sq ft floor area is adequate though not spacious for two hikers. However, the near-vertical walls and 44-inch peak height create excellent usable space. The shelter’s condensation management proved outstanding, with thoughtfully placed vents and breathable panels maintaining comfort even during humid conditions.
For adventurers who need confidence in their shelter when understanding wind resistance in alpine tents becomes a matter of safety rather than merely comfort, the Portal represents an outstanding option that doesn’t sacrifice setup simplicity.
Key Features that Make Pitching Faster and Easier
After testing dozens of shelter designs, we’ve identified specific features that consistently contribute to faster, more intuitive setup:
Pole Design Elements
- Hub systems dramatically simplify pole assembly by pre-connecting segments in the correct configuration, reducing setup to essentially “unfold and extend”
- Color-coded poles and connection points eliminate guesswork about which pole goes where
- Single-pole designs reduce complexity at the cost of some interior space
- Pre-connected pole segments prevent lost pieces and simplify the assembly sequence
Attachment Methods
- Clip systems offer significantly faster attachment than sleeve designs and allow for easier adjustments
- Mixed clip/sleeve hybrids provide a good balance of simplicity and stability
- Quick-clip systems with larger clips reduce fumbling with small components
- Pre-attached components like integrated rainflies eliminate entire steps from the setup process
Symmetry and Visual Cues
- Symmetrical designs reduce the need to identify specific corners or orientations
- Contrasting colors at connection points create visual indicators for proper alignment
- Logically sequenced attachments guide users through the correct setup order
- Intuitive tensioning systems make fine adjustments straightforward
Understanding these freestanding hiking tent design features helps hikers evaluate options based on setup simplicity rather than just specifications or weight. These seemingly small details make a substantial difference in real-world usability, especially when setting up camp in challenging conditions or after exhausting days on trail.
Freestanding vs. Semi-Freestanding vs. Non-Freestanding: Practical Differences
Understanding the spectrum of shelter designs helps hikers make informed choices based on their specific needs and priorities:
Freestanding Shelters
Pros:
– Complete setup without any stakes
– Can be pitched on any surface (rock, wooden platforms, sand)
– Easily repositioned after initial setup
– Typically simpler learning curve
Cons:
– Usually heavier than other designs
– Often bulkier when packed
– Generally more expensive
Best for: Weekend backpackers, campers frequently using established sites with varied surfaces, beginners, and those prioritizing convenience over weight.
Semi-Freestanding Shelters
Pros:
– Main structure stands without stakes
– Only requires minimal staking (typically for vestibules)
– Lighter than fully freestanding designs
– Good compromise of stability and weight
Cons:
– Not fully functional without at least some stakes
– Vestibules may not be usable on hard surfaces
– Moderate learning curve
Best for: Weight-conscious hikers who still want setup simplicity, those mostly camping on soil but occasionally on hard surfaces.
Non-Freestanding Shelters
Pros:
– Lightest possible design
– Usually most compact when packed
– Often lower cost
– Potentially more wind-stable when properly pitched
Cons:
– Requires suitable staking ground
– More complex setup process
– Steeper learning curve
– Limited repositioning ability
Best for: Ultralight backpackers, thru-hikers, experienced users comfortable with more technical setup processes.
The definitive guide to freestanding shelters explores these differences in greater depth, but for most hikers seeking the optimal balance of setup simplicity and functionality, freestanding or semi-freestanding designs offer clear advantages despite their slight weight penalty.
Expert Tips for Faster Tent Setup in Any Conditions
Practice deliberately before your trip
Don’t just set up your shelter once in ideal backyard conditions. Practice multiple times, including in darkness and while wearing gloves, to build muscle memory that will serve you in challenging field conditions.Pack strategically for efficient access
Store your tent components in reverse order of use: rainfly accessible first, then tent body, then poles. This eliminates digging through your pack or dumping everything out to find what you need next.Select your site thoughtfully
Look for naturally protected areas that block wind, have good drainage, and offer relatively flat ground. The few minutes spent finding an optimal site often save much more time in setup complications.Position your body effectively
Stand upwind of your shelter during setup to prevent it from blowing away. For larger shelters, position yourself in the center rather than moving around the perimeter repeatedly.Develop a consistent sequence
The fastest tent setups follow the same sequence every time, eliminating decision-making when you’re tired. Develop your personal system and stick with it.Master adverse weather techniques
In heavy rain, set up the rainfly first (if your shelter design allows) and then the inner tent underneath. In high winds, set up with the narrowest profile facing the wind to reduce resistance.Use natural anchors on hard surfaces
When camping on freestanding tents on rocky terrain, use rocks, logs, or gear bags as anchors rather than struggling with stakes that won’t penetrate.
These techniques significantly reduce setup time regardless of which shelter you choose. Many experienced backpackers can reduce their setup times by 30-50% simply by refining their process rather than buying new gear.
Caring for Your Freestanding Shelter to Maintain Easy Setup
Proper maintenance ensures your shelter continues to set up smoothly for years of adventure:
Pole System Care
- Clean regularly: Wipe poles with a damp cloth after dusty or sandy trips to prevent abrasive wear
- Dry completely: Always allow poles to dry fully before storage to prevent corrosion of internal shock cords
- Store unstressed: Store poles fully assembled but not tightly compressed, which can damage shock cords
- Inspect connections: Regularly check hub systems and connectors for signs of cracking or stress
Fabric and Structure Maintenance
- Clean strategically: Spot clean with mild soap and water rather than full immersion
- Dry thoroughly: Never pack away a damp shelter—mildew damages waterproof coatings
- Avoid prolonged UV exposure: Excessive sun exposure degrades fabric and waterproofing
- Store loosely: Store in a larger sack than provided to reduce stress on fabrics and seams
Component Maintenance
- Lubricate zippers: Apply zipper lubricant periodically to maintain smooth operation
- Replace guylines proactively: Replace frayed or damaged guylines before they fail
- Refresh waterproofing: Reapply seam sealer and DWR coatings as needed
- Track components: Keep specialized components (unique stakes, pole repair sleeves) together
With proper care, a quality waterproof backpacking tent can provide reliable service for 5+ years of regular use. This maintenance routine preserves not just the shelter’s weather protection but also the smooth setup experience that makes freestanding designs so appealing.
Frequently Asked Questions
Can truly freestanding tents be used without any stakes?
Yes, truly freestanding tents will stand on their own without stakes. However, we recommend using at least some stakes in anything beyond completely calm conditions to prevent the shelter from shifting or becoming airborne in unexpected gusts.
How much time should it take to set up a freestanding tent?
With practice, most freestanding shelters can be set up in 2-4 minutes in fair conditions. First-time users typically require 4-6 minutes. Complex or larger shelters may take longer, especially in challenging weather.
Are ultralight freestanding tents less durable?
Generally yes, ultralight models use thinner materials (often 10-20 denier vs. 40-70 denier in standard models). This requires more careful site selection and handling, though proper care can still yield years of reliable service.
What’s the difference between clips and pole sleeves for setup ease?
Clip attachments are significantly faster to connect and allow for adjustments after initial setup. Sleeve systems take longer to thread but typically create a more stable structure in high winds. Many modern designs use hybrid approaches for an optimal balance.
How do freestanding tents perform in high winds?
Without proper staking, even freestanding tents become vulnerable in winds above 15-20 mph. With recommended staking and guylines, quality freestanding shelters can handle winds of 30+ mph, though performance varies significantly between models.
Can one person easily set up a 2-person freestanding tent?
Yes, all the 2-person freestanding shelters in our review can be set up by a single person. Some designs are more challenging for solo setup, particularly in windy conditions, but the freestanding nature generally makes single-person setup straightforward.
How to Choose the Right Freestanding Shelter for Your Hiking Style
Matching your shelter to your specific hiking style and priorities ensures the best experience on the trail:
Weekend Backpackers
If you typically take 1-3 night trips and don’t mind carrying a few extra ounces for comfort, prioritize ease of setup and interior space. The MSR Hubba Hubba NX or REI Half Dome SL 2+ offers an ideal balance of convenience and comfort.
Thru-Hikers and Ultralight Enthusiasts
When covering high daily mileage or planning trips longer than a week, every ounce matters. The ZPacks Free Duo or Nemo Dagger OSMO delivers freestanding convenience without excessive weight penalty.
All-Season Adventurers
For hikers regularly encountering challenging weather conditions, the SlingFin Portal provides exceptional stability and weather resistance while maintaining reasonable weight and setup simplicity.
Budget-Conscious Explorers
Quality doesn’t have to break the bank. The REI Co-op Half Dome SL 2+ delivers remarkable performance at a significantly lower price point than premium competitors, with only a modest weight penalty.
The ideal shelter balances your personal priorities across several factors:
– Setup simplicity vs. absolute minimum weight
– Interior space vs. packed size
– Weather resistance vs. ventilation
– Durability vs. weight
Understanding various types of freestanding shelters for hiking helps match your specific needs to the appropriate design. By carefully considering your typical conditions, trip duration, and personal preferences, you can select a shelter that will provide years of comfortable, stress-free backcountry accommodation.