
1. The Defining Characteristics of Freestanding Tent Design
Freestanding tents represent a distinct category in the hiking shelter world, characterized by their ability to maintain their shape without the need for stakes or guy lines. Unlike their non-freestanding counterparts, these tents stand independently thanks to their ingenious pole architecture that creates a self-supporting structure.
The self-supporting nature of freestanding shelters for hikers offers several key advantages that make them popular among outdoor enthusiasts:
- Versatility on challenging surfaces: They can be set up on rocky terrain, sand, wooden platforms, and other surfaces where staking is difficult or impossible
- Repositioning flexibility: Once pitched, the entire tent can be lifted and moved without disassembly
- Simplified setup process: The structure stands on its own during setup, making it easier for solo campers
- Complete stability: When properly guyed out, they provide excellent resistance against wind and weather
While non-freestanding tents rely entirely on stakes and tension for their shape, and freestanding vs staked hiking shelters have different structural principles, semi-freestanding designs blend both approaches with partial self-support.
Freestanding designs excel in scenarios like desert camping where sand makes staking challenging, or alpine environments with rocky ground that resists tent stakes. Popular designs include dome tents with crossing poles and geodesic structures with multiple pole intersections for enhanced stability.
Understanding these fundamental characteristics provides the foundation for appreciating the importance of specific design features that enhance the performance of freestanding tents on the trail.
2. Pole Systems: The Structural Foundation
The pole system is the literal backbone of any freestanding tent, determining its shape, stability, and weight. These critical components transform a flat piece of fabric into a three-dimensional shelter that can withstand environmental challenges.
Pole Materials and Properties
Modern freestanding tents typically use one of two primary pole materials:
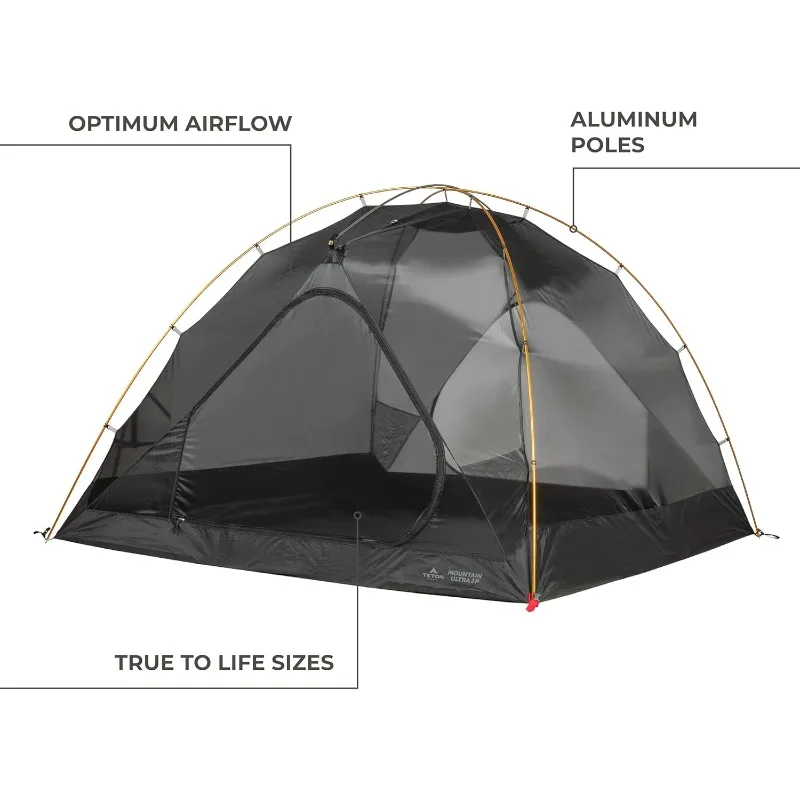
Aluminum alloys: The most common choice, offering an excellent balance of strength, weight, and durability. Premium DAC Featherlite poles use aerospace-grade aluminum for superior strength-to-weight ratio. Aluminum poles generally offer better durability and value.
Carbon fiber: Found in ultralight designs, these poles weigh significantly less than aluminum but come at a higher price point. They provide exceptional stiffness but can be more brittle in extreme conditions.
The diameter of tent poles directly influences their strength—thicker poles offer better wind resistance and durability but add weight to your pack.
Pole Configurations
The arrangement of poles creates the tent’s fundamental architecture:
- Cross-pole (X-shape): Creates a simple, stable dome with good headroom in the center
- Hubbed pole systems: Uses central connection points to create an integrated framework with improved strength and simplified setup
- Pre-bent poles: Features slight curves that push walls outward, increasing interior volume
- Ridge poles: Additional horizontal poles that expand width and create steeper walls for improved livability
The freestanding tent structure explained shows how pole design directly influences everything from weather resistance to interior space. Advanced designs like DAC’s Featherlite NSL poles offer strength ratings that withstand significant snow loads while minimizing weight.
The pole architecture sets the foundation for the tent’s overall performance, determining not just its shape but also its ability to withstand environmental challenges while remaining portable enough for hiking adventures.
3. Canopy and Rainfly Materials: Balancing Protection and Weight
Freestanding hiking tents typically employ a dual-layer system consisting of an inner canopy and an outer rainfly. This design allows for versatility across different weather conditions while managing moisture effectively.
Inner Tent Materials
The inner canopy serves as the living space and typically features:
- Body fabrics: Primarily nylon or polyester, with nylon offering better strength-to-weight ratio but polyester providing better UV resistance and less stretching when wet
- Mesh panels: Strategic placement allows for ventilation, star-gazing, and insect protection
- Fabric density: Measured in denier (D), with lower numbers indicating lighter (but generally less durable) materials—typical tent bodies range from 10D-70D
Rainfly Materials and Waterproofing
The rainfly provides weather protection and typically features:
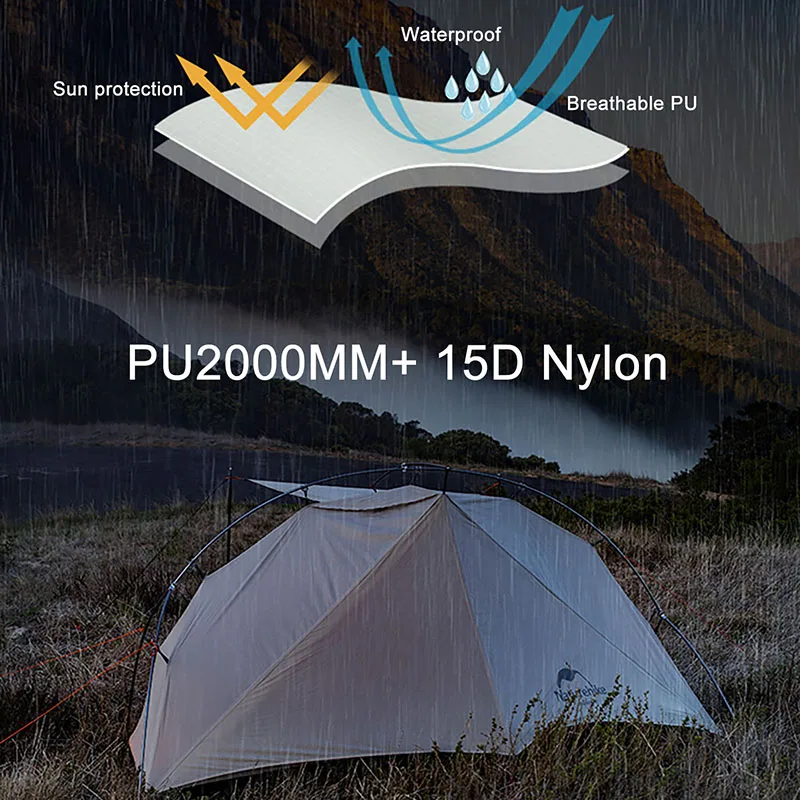
- Silicone-coated nylon (silnylon): Offers excellent waterproofing while remaining lightweight and packable
- Polyurethane (PU) coatings: Applied to the inside of the fabric to enhance water resistance
- Waterproof ratings: Measured in millimeters of hydrostatic head, indicating how much water pressure the fabric can withstand before leaking
Understanding tent waterproof ratings helps hikers match their shelter to expected conditions. Ratings typically range from 1500mm (adequate for light rain) to 5000mm+ (capable of handling heavy, wind-driven precipitation).
Rainfly coverage varies between models, with full-coverage designs extending to the ground for maximum protection, while partial coverage designs save weight but offer less protection in severe conditions.
Our freestanding backpacking tent collection showcases various material combinations designed for different environmental challenges. The differences between a 15D silnylon ultralight tent and a more robust 70D polyester model demonstrate how material choices directly impact both protection capabilities and packed weight—typically the primary consideration for hikers carrying their shelter over long distances.
4. Interior Design: Maximizing Livability in Limited Space
Creating comfortable living space within the constraints of a packable hiking tent requires thoughtful interior design. Every square inch matters when you’re spending hours or days inside your shelter.
Floor Design Considerations
The tent floor is your barrier against ground moisture and rough terrain:
- Floor dimensions and shapes: Rectangular floors maximize usable space, while tapered designs reduce weight by narrowing at the foot end
- Bathtub floor construction: Raised waterproof flooring that extends several inches up the tent walls prevents splashing water from entering
- Floor materials: Typically made from higher denier fabric (often 30-70D) than the walls to withstand abrasion and punctures
Wall Architecture and Space Optimization
The shape of the tent walls dramatically affects usable interior space:
- Wall angles: Near-vertical walls create more usable volume than steeply sloping walls
- Peak height: Determined by pole structure and directly impacts sitting and changing comfort
- Volume-to-weight ratio: High-quality designs maximize interior space while minimizing fabric weight
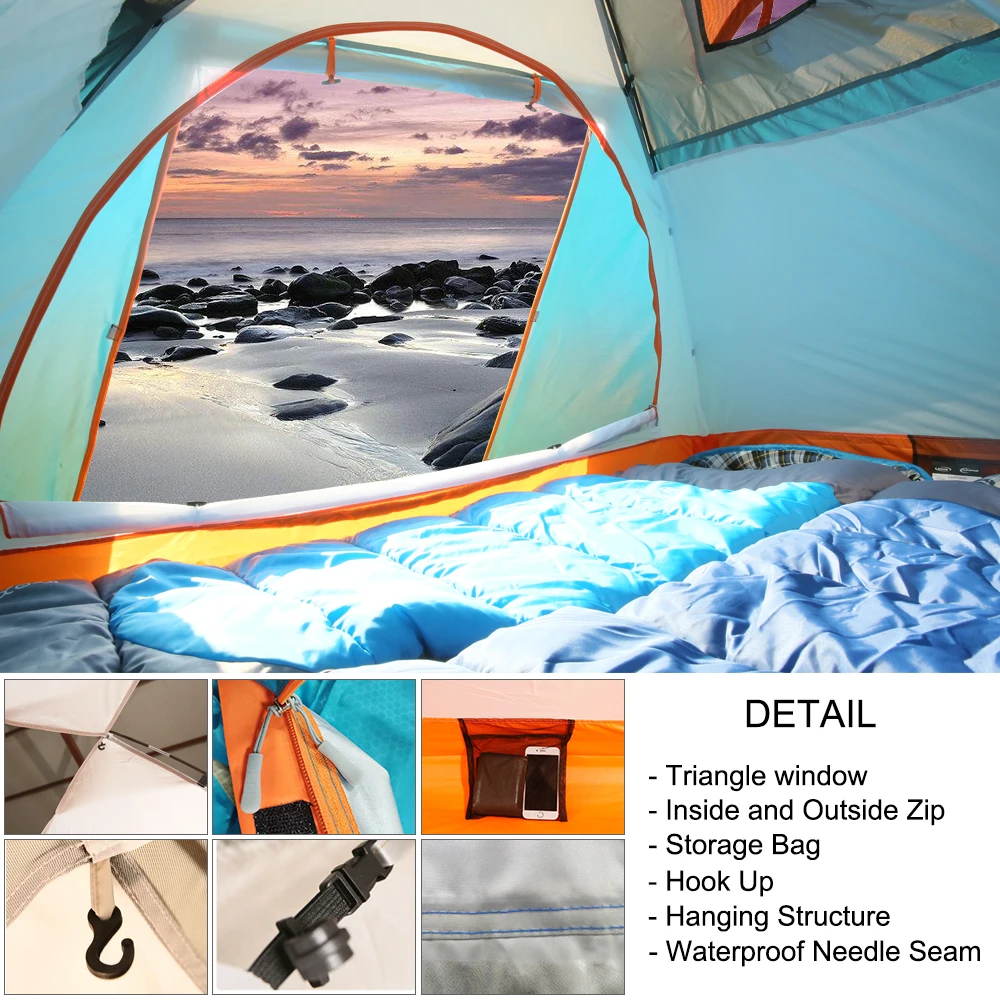
Entrance and Storage Features
Access and organization features enhance the functional use of limited space:
- Door design: Single doors save weight, while double doors improve convenience and ventilation
- Door shapes: D-shaped doors offer easy access, while J-zip designs can be partially opened for ventilation
- Vestibules: These covered external areas provide protected storage for boots and packs without sacrificing interior space
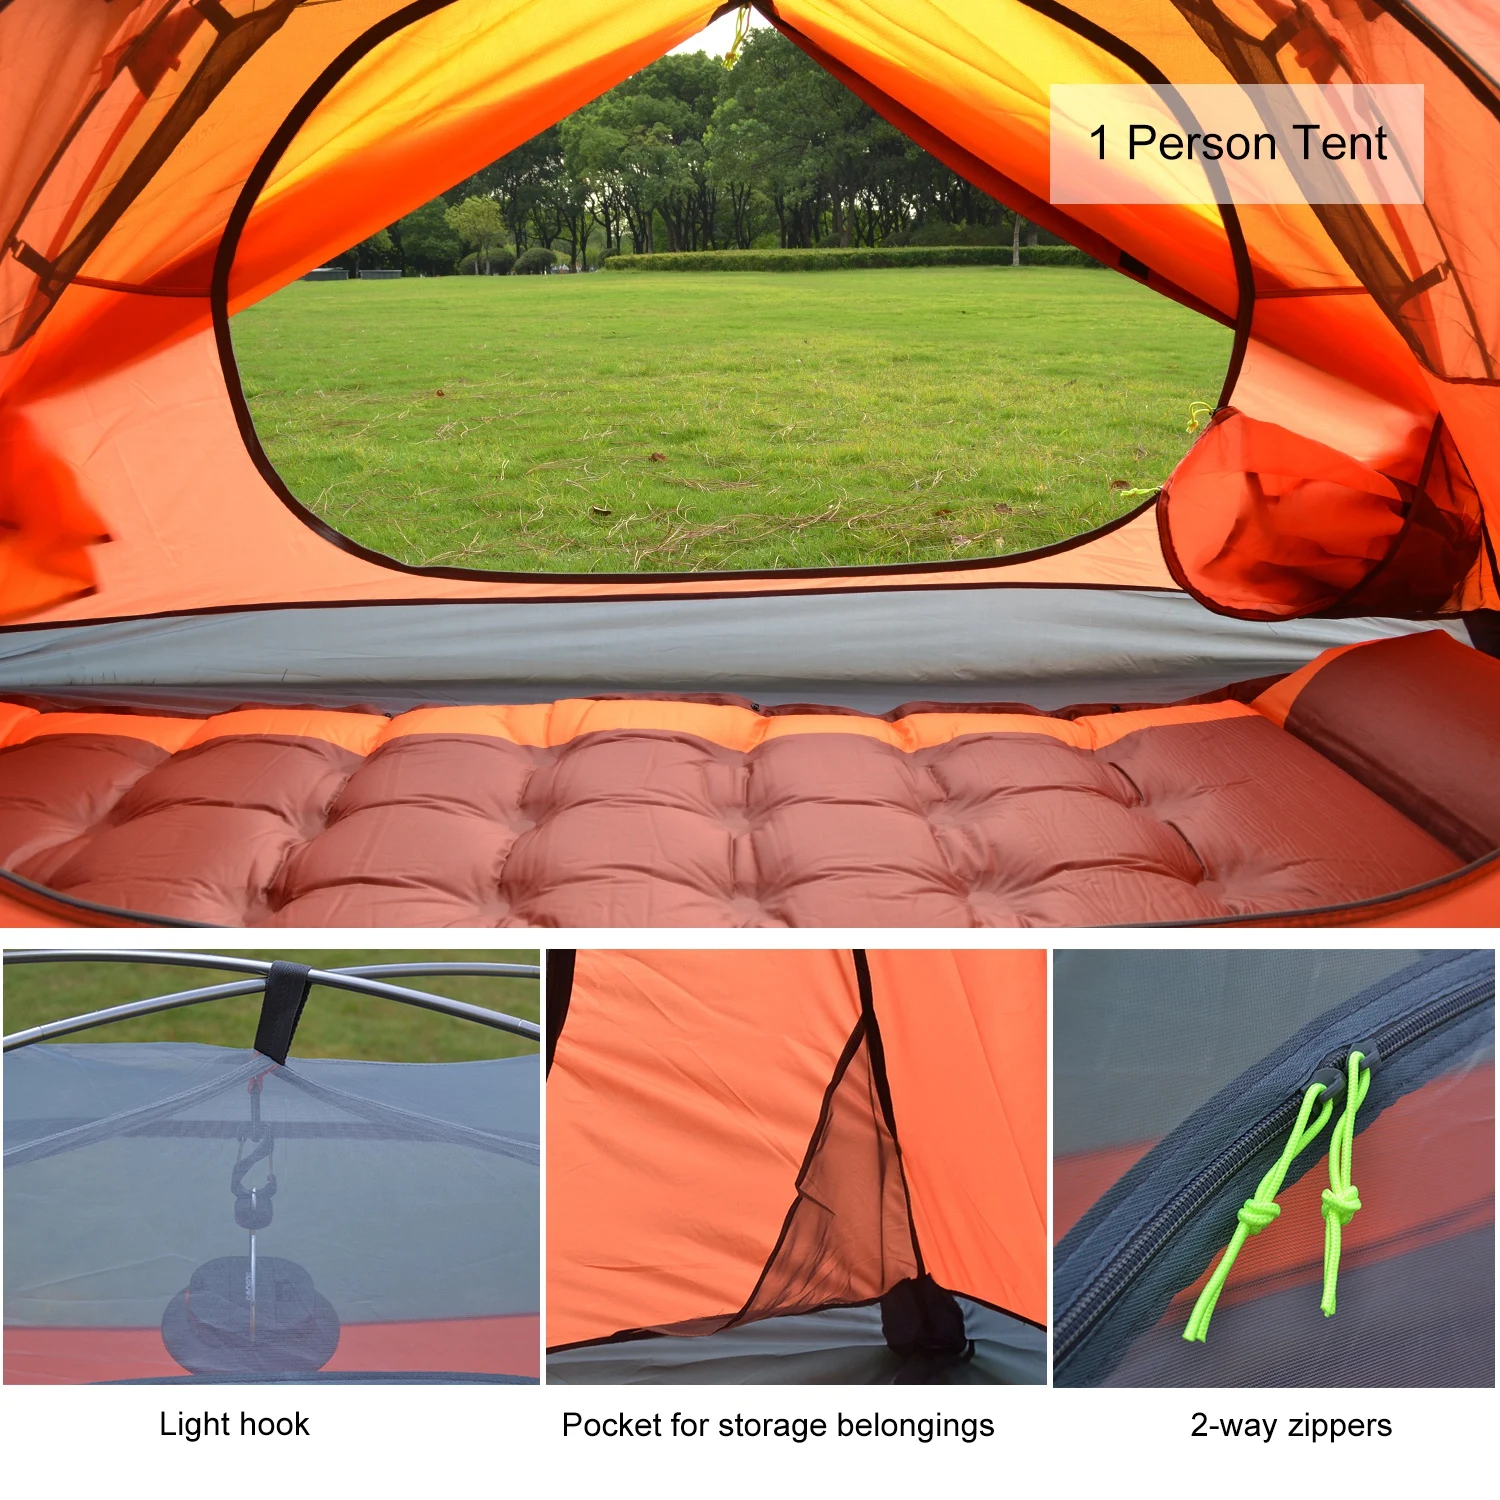
- Interior organization: Well-designed pockets, gear lofts, and loops help manage small items and keep the living space uncluttered
Our backpacking tent vestibule options demonstrate how extended protected space enhances livability without adding significant weight. Typical two-person tents offer around 28-32 square feet of floor space with peak heights of 38-42 inches—dimensions that require clever design to create a comfortable shelter.
The best interior designs balance the competing needs of space and weight, creating functional living areas that remain portable enough for backpacking adventures.
5. Ventilation Engineering: Managing Condensation
Condensation management represents one of the most significant challenges in tent design. When warm, moist air from breathing and body heat meets cool tent walls, condensation forms—potentially soaking gear and reducing insulation effectiveness.
The Double-Wall Advantage
Most freestanding hiking tents use a double-wall design, with separate inner tent and rainfly layers. This system creates an air gap that allows moisture vapor to escape while preventing precipitation from entering—a major advantage over single-wall designs.
Strategic Ventilation Features
Effective tents incorporate multiple ventilation strategies:
- High/low venting: Creates natural convection airflow as warm air rises and exits through upper vents while fresh air enters below
- Adjustable vents: Allow fine-tuning of airflow based on conditions, with storm flaps to prevent water entry during rain
- Mesh panels: Strategic placement in the inner tent allows constant vapor escape while maintaining bug protection
- Kickstand vents: Rigid supports that hold rainfly vents open even during rain
- Rainfly adjustment: Ability to raise the rainfly edges in good weather increases airflow dramatically
Good ventilation design requires balancing airflow with weather protection. In humid environments, look for maximum ventilation features found in many lightweight backpacking tent designs, which often incorporate more mesh and multiple adjustment points.
The importance of ventilation becomes particularly evident in challenging conditions: cold nights when the temperature differential between inside and outside is greatest, humid environments where ambient moisture is already high, and situations where wet gear must dry inside the tent.
Well-designed ventilation systems work in harmony with the tent’s overall structure, ensuring comfort across varying environmental conditions while preventing the discomfort of waking up to a dripping interior.
6. Setup Mechanics: Design Elements for Easy Pitching
The ease and speed of tent setup can significantly impact your hiking experience, especially in adverse weather conditions. Freestanding tent designs incorporate various features that simplify the pitching process.
Pole-to-Canopy Attachment Systems
How the poles connect to the tent body affects both setup ease and structural integrity:
- Clip systems: Allow quick attachment of the canopy to the pole structure after assembly, offering better ventilation and easier setup
- Sleeve systems: Poles slide through fabric tubes, creating a more stable structure but requiring more effort during setup
- Hybrid designs: Combine sleeves at high-stress points with clips elsewhere, balancing strength and convenience
- Hub connections: Pre-connected pole sections that unfold into position, reducing assembly time and complexity
User-Friendly Design Elements
Thoughtful details can dramatically improve the setup experience:
- Color-coding: Matching colors on poles, grommets, and attachment points eliminate guesswork
- Symmetrical layouts: Allow the tent to be set up without specific orientation
- Pre-attached components: Some models feature rainflies that remain attached to the inner tent for single-step setup
Guy Line Systems
While freestanding tents stand without stakes, proper guying improves performance:
- Strategic attachment points: Positioned to maximize stability in wind
- Tensioning systems: Built-in line adjusters allow quick tightening
- Reflective cordage: Improves visibility at night, reducing tripping hazards
Different types of freestanding shelters for hiking employ various setup systems, with premium designs typically offering setup times under 5 minutes. Weather-specific considerations often dictate the need for proper guying—what works for calm conditions may prove insufficient in high winds or heavy precipitation.
The most effective setup designs balance speed with structural integrity, recognizing that a tent that pitches quickly but fails in challenging conditions provides false economy.
7. Portability Engineering: Weight and Packed Size
For hikers, every ounce matters when carrying gear over long distances. Freestanding tents typically weigh more than their non-freestanding counterparts due to the pole structure required for self-support, creating what many call the “freestanding weight penalty.”
Weight-Saving Design Strategies
Manufacturers employ various techniques to minimize this weight disadvantage:
- Minimalist pole connections: Lightweight clips and attachment points that maintain strength while reducing material
- Strategic material distribution: Using thinner materials in low-stress areas while maintaining durability in high-wear zones
- Hardware optimization: Lightweight zippers, cord locks, and adjustment points that save grams without compromising function
Packed Size Considerations
Volume in your backpack is often as precious as weight capacity:
- Pole segment length: Shorter segments create more compact packages but require more connection points
- Compression technology: Specialized stuff sacks with compression straps reduce packed volume
- Folding geometry: Thoughtful design allows components to nest efficiently when packed
When comparing freestanding vs non-freestanding ultralight tents, you’ll notice significant weight differences. Typical ultralight freestanding tents weigh 2-3 pounds, lightweight models 3-4 pounds, and standard versions 4-6 pounds—compared to non-freestanding designs that might weigh under 2 pounds.
Our ultralight freestanding tent collection demonstrates how innovative materials and design can minimize this weight penalty. The component breakdown typically shows poles contributing 25-40% of total tent weight, highlighting why advanced pole materials make such a difference in overall portability.
The best designs find an optimal balance between the stability advantages of freestanding construction and the weight considerations essential for comfortable backpacking.
8. Weather Resistance: Structural Design for the Elements
A tent’s ability to withstand challenging weather conditions depends largely on its structural design. Geometry, reinforcement, and water management systems all contribute to creating a secure shelter in adverse conditions.
Geometric Design for Stability
The tent’s shape directly influences its performance in wind and under snow load:
- Low-profile designs: Tents with lower peak heights and aerodynamic shapes offer less wind resistance
- Geodesic structures: Multiple pole crossings create triangulated frameworks that distribute stress and excel in heavy snow conditions
- Pole diameter and material: Stronger poles resist bending in high winds but add weight
Reinforcement Strategies
Strategic reinforcement prevents failure at critical points:
- Seam design: Stress-oriented seam placement directs forces along the strongest paths
- Reinforced anchor points: Extra material where poles, guy lines, and stakes connect to the tent
- Guy out points: Multiple attachment locations allow customized anchoring based on conditions
Water Management Systems
Beyond basic waterproof materials, design features keep water outside where it belongs:
- Fly-to-inner tent spacing: Adequate separation prevents water transfer during contact
- Seam construction: Taped or welded seams prevent water penetration at stitching points
- Water channeling: Design features direct water away from doors and vents
Mastering wind stability in freestanding tents requires understanding how these elements work together. Our collection of waterproof backpacking tents demonstrates various approaches to weather protection across different designs.
Weather ratings vary significantly between models—3-season tents handle moderate conditions while 4-season designs withstand extreme environments. Some manufacturers provide specific wind ratings (typically 30-60 mph for backpacking tents), though real-world performance depends on proper setup and guying.
The most weather-resistant designs achieve their performance through thoughtful integration of all these elements rather than focusing on any single feature.
9. Design Trade-offs: Balancing Competing Priorities
Creating the perfect freestanding tent requires navigating inevitable trade-offs between desirable characteristics. Understanding these compromises helps hikers select the tent that best matches their priorities.
Key Design Compromises
Every tent design represents a series of balanced trade-offs:
- Structural stability vs. weight: More poles and stronger materials enhance stability but increase what you carry
- Interior space vs. packed size: Roomier tents with vertical walls pack larger than minimal designs
- Ventilation vs. weather protection: More mesh improves airflow but can reduce warmth in cold conditions
- Durability vs. ultralight construction: Thinner materials save weight but typically reduce longevity
Manufacturers address these competing demands through specialized designs targeting specific use cases. Expedition tents prioritize weather resistance over weight, while ultralight models make the opposite choice.
The terrain and conditions of your typical adventures should guide which compromises make sense for you. Desert hikers might prioritize ventilation and UV resistance, while alpine climbers need wind stability and snow-shedding designs.
Emerging materials like Dyneema Composite Fabric and carbon fiber nano poles are beginning to reduce some traditional trade-offs, offering strength with less weight—though often at premium price points.
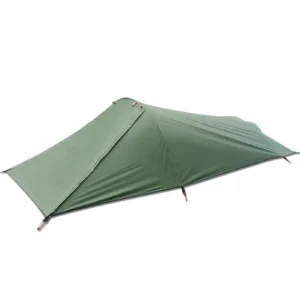

Lightweight Backpacking Tent, Ultralight Backpacking Tent, Ultralight Bivy Tent
Ultralight Single Person Camping Tent with Aluminum Poles for 3-Season Backpacking Waterproof DesignPrice range: $94.88 through $326.82 Select options This product has multiple variants. The options may be chosen on the product page
Lightweight Backpacking Tent, Ultralight Backpacking Tent, Waterproof Backpacking Tent
$391.05 Select options This product has multiple variants. The options may be chosen on the product page
Compact Backpacking Tent, Lightweight Backpacking Tent, Waterproof Camping Tent
$335.52 Select options This product has multiple variants. The options may be chosen on the product page
Heavy Duty 4 Season Tent, Ultralight Freestanding Tent, Winter Camping Tent
$3,722.66 Select options This product has multiple variants. The options may be chosen on the product page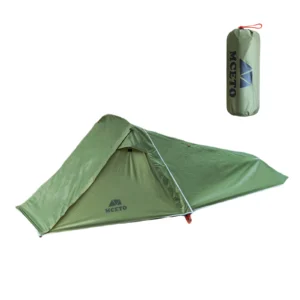
Backpacking Tent with Vestibule, Freestanding Backpacking Tent, Lightweight Backpacking Tent
Price range: $446.89 through $447.22 Select options This product has multiple variants. The options may be chosen on the product page
Backpacking Tent with Vestibule, Trekking Pole Backpacking Tent, Waterproof Camping Tent
Price range: $271.99 through $519.52 Select options This product has multiple variants. The options may be chosen on the product page
Understanding these inherent design compromises helps set realistic expectations and makes it easier to evaluate which features matter most for your specific hiking style.
10. Matching Design Features to Your Hiking Style
Selecting the right freestanding tent requires aligning design features with your specific hiking needs and preferences. Different environments and trip styles benefit from different tent characteristics.
Evaluating Features for Your Context
Consider these factors when matching tent design to your hiking style:
- Environmental conditions: Desert environments benefit from maximum ventilation and UV resistance, while alpine zones require wind stability and precipitation handling
- Trip duration: Weekend trips may prioritize comfort features, while extended expeditions might emphasize durability and weather protection
- Seasonal variation: If you hike year-round, versatility becomes crucial, possibly justifying a more adaptable design
- Group size: Solo hikers have different space needs than partners or small groups
Feature Priorities for Different Scenarios
Certain features become more valuable in specific hiking contexts:
- Alpine/exposed terrain: Prioritize pole strength, wind resistance, and complete rainfly coverage
- Hot/humid environments: Look for maximum mesh, multiple doors, and superior ventilation
- Ultralight backpacking: Focus on minimalist pole structures, lighter materials, and essential features only
- Base camping: Consider larger vestibules, more interior storage, and comfort-oriented designs
When evaluating potential tents, ask yourself: Will this tent perform in my worst-case weather scenario? Does the weight-to-protection ratio make sense for my typical trips? How important is setup speed in my usual conditions?
Our comprehensive freestanding hiking shelters guide provides deeper context for making these decisions based on real-world experience. Future tent designs continue to evolve toward better strength-to-weight ratios, more adaptable configurations, and improved environmental performance.
The ideal tent for you isn’t necessarily the lightest, strongest, or most feature-rich—it’s the one that best addresses your specific hiking environments and personal preferences.
11. Are Freestanding Tents Worth the Extra Weight?
One of the most common questions hikers face when considering freestanding tents is whether their benefits justify carrying extra weight—often 8-16 ounces more than comparable non-freestanding designs.
When the Weight Penalty Makes Sense
Freestanding designs prove their worth in several specific scenarios:
- Difficult staking conditions: Rocky ground, wooden platforms, desert sand, or frozen surfaces where securing stakes is problematic
- Frequent repositioning needs: When you might need to move your pitched tent to avoid rising water, falling branches, or to find better ground
- Structural stability: In exposed conditions where self-supporting architecture provides superior wind resistance
- Setup simplicity: For solo hikers or those who value straightforward, consistent pitching
Weight-Saving Strategies for Freestanding Users
If you’re committed to freestanding benefits but concerned about weight:
- Consider ultralight pole materials like carbon fiber or aluminum alloys
- Look for models with minimalist rainflies for fair-weather trips
- Evaluate semi-freestanding designs that offer some benefits with less weight
- Pack lighter stakes when appropriate for conditions
The typical weight difference between comparable freestanding and non-freestanding designs ranges from 8-24 ounces—roughly half a pound to a pound and a half. For many hikers, this represents an acceptable trade-off for the versatility and convenience freestanding designs provide.
12. How Do Double-Wall and Single-Wall Freestanding Designs Compare?
Freestanding tents come in both double-wall and single-wall configurations, each with distinct advantages for different hiking scenarios.
Double-Wall Construction
Traditional double-wall designs feature separate inner tent and rainfly components:
Pros:
– Superior condensation management through the air gap between layers
– Versatility to use just the inner tent in dry, bug-heavy conditions
– Better temperature regulation across varying conditions
Cons:
– Heavier than comparable single-wall designs
– More complex setup with multiple components
– Typically larger packed size
Single-Wall Construction
Single-wall designs integrate waterproof/breathable fabric into a single-layer structure:
Pros:
– Lighter weight—often 25-40% lighter than comparable double-wall models
– Simpler, faster setup with fewer components
– More compact packed size
Cons:
– More condensation challenges, especially in humid or cold conditions
– Less versatility across different environments
– Often less breathable in warm weather
Our 2-person backpacking tents collection includes both design types to accommodate different preferences and conditions. Double-wall designs typically excel in variable or humid conditions, while single-wall models offer advantages for weight-conscious hikers in drier climates.
The choice between these construction methods often depends on your environmental conditions—single-wall designs perform best in arid regions with low humidity and significant temperature swings, while double-wall construction offers more versatility across diverse environments.
13. What Design Features Matter Most for Extreme Weather?
When facing challenging weather conditions, specific design elements become crucial for safety and comfort. Extreme weather demands specialized features beyond what’s needed for typical 3-season hiking.
Critical Elements for Severe Conditions
For high winds, heavy snow, and sustained precipitation, prioritize:
- Pole configuration: Geodesic or semi-geodesic designs with multiple crossing points distribute stress and prevent collapse
- Pole material and diameter: Stronger, thicker poles resist deformation under snow load and high winds
- Vestibule design: Snow-shedding shapes and adequate cooking space keep essential activities protected
- Guy line systems: Multiple attachment points with reflective, non-stretching cord maintain tension
Specialized Materials for Extreme Conditions
Expedition-grade freestanding tents use materials optimized for harsh environments:
- Higher denier fabrics (often 50-70D) for improved tear strength
- Silicone coatings on both sides of the rainfly for maximum waterproofing
- Specialized pole materials like aerospace-grade aluminum or carbon-fiber composites
- Reinforced stake loops and guy points to handle increased tension
Ventilation Solutions for Weather Integrity
Managing airflow while maintaining weather protection requires specialized approaches:
- Protected venting systems with snow/rain covers
- Strategic mesh placement that balances airflow with storm protection
- Adjustable systems that can be reconfigured based on conditions
The design principles described in our four-season tent features and benefits guide showcase how these elements come together in extreme-condition shelters. Mountain-specific adaptations often include features like reinforced pole sleeves, reduced mesh area, and multiple guy-out points that wouldn’t be necessary for more moderate conditions.
While these specialized features add weight, they provide essential protection when environmental conditions become challenging—demonstrating how tent design must ultimately match the specific demands of your intended use.