
Understanding Trekking Pole Tents
Trekking pole tents represent one of the most innovative developments in lightweight backpacking gear. These specialized shelters use your hiking poles for structural support instead of traditional tent poles, eliminating significant weight from your pack. The concept is brilliantly simple: why carry dedicated tent poles when you’re already bringing trekking poles for hiking?
The benefits of trekking pole tents are substantial:
– Significant weight reduction: Typically 1-2 pounds (0.5-0.9 kg) lighter than conventional freestanding tents
– Smaller pack size: Without poles, these tents compress down much smaller
– Dual-purpose gear: Your trekking poles serve two essential functions
– Surprising stability: When properly pitched, many shelter options for two campers using trekking poles can withstand challenging weather conditions
Trekking pole tents come in several common designs, including pyramid/mid styles, A-frames, and tunnel configurations. Each offers different benefits for space, stability, and ease of setup. It’s worth noting that the setup process differs significantly from traditional freestanding tents, requiring more attention to site selection and staking technique.
Understanding how trekking pole tents work is essential before your first pitch. While the learning curve might be slightly steeper than with freestanding tents, the weight savings and satisfaction of mastering this ultralight shelter system make the effort worthwhile.
Essential Gear for Trekking Pole Tent Setup
Before attempting to pitch your trekking pole tent, ensure you have all necessary components ready:
Tent Components:
– Tent body (flysheet)
– Inner tent/mesh (if your model uses a separate inner)
– Guylines (usually pre-attached)
– Stuff sacks and repair materials
Trekking Poles:
– Adjustable poles are strongly preferred for precise height adjustment
– Most tents require pole heights between 115-130 cm (45-51 inches)
– Check your specific tent’s requirements before setting out
– Your compatible trekking poles for tents should be sturdy enough to support the tension
Stakes:
– Bring more than you think you need (typically 6-10 depending on tent design)
– Different stake types work better in different conditions:
– Y-stakes or V-stakes: Excellent all-around performance
– Shepherd hooks: Lighter but less holding power in soft ground
– Snow/sand stakes: Essential for those specific conditions
– Rock pegs: For extremely hard ground
Additional Helpful Items:
– Guyline tensioners or cordlocks for easy adjustments
– Small repair kit (tenacious tape, spare cordage)
– Ground cloth/footprint (optional but recommended for protecting tent floor)
The right equipment makes all the difference when setting up your shelter. Explore our collection of quality trekking pole backpacking tents designed for reliable performance in diverse conditions.
Choosing the Ideal Pitch Location
Finding the perfect spot to pitch your trekking pole tent is crucial for comfort, safety, and tent longevity. Take your time with this step—it’s easier to move your unpitched tent than to relocate after setup.
Ground Conditions:
– Seek relatively flat terrain with good drainage
– Remove sharp objects (sticks, stones) that could puncture your tent floor
– Look for natural ground padding like short grass or pine needles
– Avoid depressions where water might pool during rain
Environmental Considerations:
– Note prevailing wind direction and position your tent accordingly
– Use natural windbreaks like boulders or shrubs when possible
– Consider sun exposure for morning warmth or afternoon shade
– Stay away from dead or damaged trees (potential “widow makers”)
Safety Factors:
– Never set up in dry river beds (flash flood risk)
– Maintain distance from cliff edges and steep slopes
– Be aware of wildlife corridors and insect breeding grounds
– Consider proximity to water sources (convenient but not too close)
Spatial Requirements:
– Trekking pole tents typically need more space for guylines than freestanding models
– Ensure you have adequate room to stake out all sides properly
– Remember that mastering trekking pole tent setup on different terrain types requires adaptability
Remember to follow Leave No Trace principles: always pitch on durable surfaces and avoid damaging vegetation. When breaking camp, restore the site to its natural condition.
Pre-Setup Preparation Steps
Proper preparation makes the difference between a frustrating experience and a smooth setup. Follow these steps before actually erecting your tent:
Unpack and organize your gear – Lay out all components in logical order of use (tent body, inner tent, stakes, guylines, etc.)
Identify your tent’s design approach – Determine if your model is inner-first or outer-first (most trekking pole tents are outer-first)
Adjust trekking poles to recommended height – Check your specific tent’s requirements, typically between 115-130 cm (45-51 inches)
Orient the tent properly – Position the entrance away from prevailing winds and toward your preferred view
Clear the ground thoroughly – Remove rocks, sticks, pinecones and other debris that could damage your tent floor
Taking these few minutes to prepare saves time and prevents common pitching problems. Many ultralight trekking pole tent users develop a consistent routine that helps ensure nothing gets forgotten in the setup process.
Step-by-Step Tent Pitching Process
Follow these detailed steps to achieve a perfect pitch with your trekking pole tent:
Spread the tent body flat on your chosen site with doors zipped closed.
Stake the corners at approximately 45° angles outward from the tent for maximum holding power. Don’t pull too tight yet—leave some adjustment room.
Insert trekking poles according to your tent’s design:
– Handle-up configuration (most common): Place handle against reinforced pocket in tent roof
– Tip-up configuration: Place rubber tip into reinforced pocket, with handle on ground
– Adjust pole height if needed for proper tensionSecure main guylines extending from the pole positions, maintaining equal tension on all sides.
Add the inner tent (if separate) by clipping or hooking it to attachment points inside the fly.
Stake out remaining points including vestibule(s) and additional side guylines.
Fine-tune the entire structure by:
– Ensuring the ridgeline is straight and taut
– Adjusting pole height if needed
– Repositioning stakes for better tension
– Making sure the tent floor is properly stretchedCheck entrance alignment to ensure doors open and close smoothly.
For two-person tents, having a partner help can make setup easier. Learn more about mastering two-person lightweight tent setup for efficient collaboration.
Tensioning and Guyline Techniques
Proper tensioning is what transforms a sagging shelter into a storm-worthy haven. Mastering guyline techniques is essential for a taut, secure pitch in any conditions.
The Importance of Balanced Tension
Creating tension in all directions simultaneously stabilizes your shelter. Think of your tent as a system where each point affects all others. When one side sags, it impacts the entire structure. Many experienced backpackers prefer lightweight backpacking tents with multiple adjustment points for precise tensioning.
Basic Guyline Adjustments
Most trekking pole tents include line tensioners (cordlocks) that allow quick adjustments:
– Loosen the tensioner by sliding it toward the tent
– Pull the free end of the line to increase tension
– Slide the tensioner away from the tent to lock the line
– Create even, firm pressure without excessive force that might damage fabric or seams
Useful Knots for Tensioning
When tensioners aren’t available or fail, these knots prove invaluable:
– Taught-line hitch: Creates an adjustable loop that holds under tension
– Trucker’s hitch: Provides mechanical advantage for extremely tight pitches
– Bowline: Makes a secure fixed loop for guyline anchoring
The “Drum-Tight” Test
A properly tensioned tent should make a low “thump” sound when you gently tap the fabric—similar to a drum. If you hear a dull flap, more tension is needed. Conversely, if the fabric feels like it might tear, you’ve likely overtightened.
Sequential Tensioning Method
1. Set initial tension at all points
2. Return to the first point and adjust
3. Work in a circular pattern, making small adjustments
4. Repeat until balanced tension is achieved throughout

Weather-Specific Setup Adaptations
Different weather conditions demand specific setup techniques to maximize your shelter’s performance. Here’s how to adapt your trekking pole tent setup for various conditions:
Wind Resistance Strategies
- Lower your overall tent profile by reducing pole height 2-4 inches (5-10 cm)
- Orient the narrowest profile of your tent into the wind
- Use all guyline points, even those you might skip in calm conditions
- Add crossing guylines for additional stability in high winds
- Double-stake critical anchor points in extremely high winds
- Position natural windbreaks to your advantage when possible
Rain Setup Modifications
- Ensure maximum tension to prevent rain pooling on fabric
- Angle doors away from prevailing rain direction
- Increase ventilation to manage condensation (partially open vents)
- Pitch on slightly sloped ground to encourage water runoff
- Consider lowering windward side slightly to reduce wind-driven rain penetration
- Anticipate fabric sag when wet and set initial tension tighter than normal
Snow and Sand Anchoring Techniques
- Use specialized snow or sand stakes with broader surface area
- Create “deadman anchors” by burying objects (sticks, stuff sacks filled with snow/sand) and attaching guylines
- Compact snow around stakes after initial placement
- In deep snow, use trekking poles or other equipment as additional anchors
- Allow extra time for secure anchoring in these challenging conditions
For added weather protection in severe conditions, many backpackers choose waterproof backpacking tents with reinforced weather resistance features.
Troubleshooting Common Setup Problems
Even experienced backpackers encounter challenges when pitching trekking pole tents. Here are solutions to common problems:
Problem: Sagging Fabric
Solution: Check overall tension balance and adjust guylines. In humid conditions, anticipate stretch and set initial tension tighter. Ensure poles are extended to proper height.
Problem: Unstable or Wobbly Poles
Solution: Verify poles are positioned in reinforced points correctly. Create small depressions in ground for pole tips if necessary. Ensure crossing tension from guylines is balanced.
Problem: Corners Pulling Out
Solution: Use stronger stakes, angle them away from the tent at 45°, or try the “stakes in series” technique where two stakes share load distribution.
Problem: Uneven Tent Floor
Solution: Reposition tent before fully staking, or place soft items under sleeping pad to level sleeping surface.
Problem: Excessive Condensation
Solution: Increase ventilation by opening vents and doors when possible. Avoid pitching near water sources. Wipe condensation with a small camp towel in the morning.
Problem: Difficult Stake Insertion
Solution: Use the “Z-line” technique—place stakes in good ground nearby and run guylines to them when encountering rocks or roots. In very hard ground, use a rock to carefully hammer stakes.
Problem: Door Misalignment
Solution: Adjust corner stakes to square the tent body before finalizing tension on all points.
Understanding why trekking pole supported shelters have these specific challenges helps you develop intuitive solutions when problems arise.
Quick Setup Method for Experienced Users
Once you’ve mastered the basics, this streamlined process will help you achieve a perfect pitch in under 5 minutes:
Corner staking sequence – Start with the back corners, then front corners, maintaining even tension
Pole insertion – Place both trekking poles simultaneously, adjusting height on the fly as needed
Critical tension points – Immediately secure the main guylines that support pole positions
Remaining attachments – Move clockwise around the tent, securing all remaining guylines and stakes
Final adjustment – One quick circuit around the tent, fine-tuning tension at all points
Experienced users develop an intuitive understanding of what makes lightweight tent trekking so efficient. They focus on maintaining balanced tension throughout the setup process rather than perfecting one section at a time.
The keys to speed are familiarity with your specific tent, consistent technique, and addressing major tension points first before fine-tuning. With practice, the entire process becomes fluid and automatic.
Properly Taking Down Your Trekking Pole Tent
Breaking camp efficiently is just as important as setup. Follow these steps to protect your investment and prepare for your next adventure:
Remove small stakes first, working from non-essential guylines toward the main structure points
Lower trekking poles and remove them carefully, avoiding fabric snags
Remove corner stakes while gently supporting the fabric to prevent dirt accumulation
Shake out debris before folding (if conditions permit)
Fold vs. stuff decision:
– For short trips and dry conditions: Stuffing is faster
– For longer storage: Folding prevents permanent creases and fabric memory
– When wet: Loosely stuff to allow repacking and drying laterSeparate components – Store stakes and repair kit in their designated pockets or containers
Pack poles separately from tent fabric to prevent punctures or abrasion
For additional information on packing up your shelter efficiently, our guide on mastering tent packing tips provides detailed techniques for various conditions.

Maintenance Tips for Trekking Pole Tent Longevity
Proper maintenance significantly extends your tent’s lifespan. Follow these essential care tips:
• Field cleaning – Gently brush off dirt and debris daily during trips; use a damp cloth for stubborn spots
• Drying protocol – Always dry completely before storage; set up in shade for a few hours after trips when possible
• Storage method – Store loosely in storage sack or pillowcase, not compressed in stuff sack
• Seam maintenance – Inspect seams regularly and reapply seam sealer when water repellency diminishes
• Fabric care – Clean with gentle soap (never detergent) and lukewarm water when necessary; rinse thoroughly
• Zipper maintenance – Keep clean of sand and dirt; lubricate occasionally with zipper-specific lubricant
• Pole attachment points – Regularly inspect for wear and reinforce if needed
• UV exposure management – Minimize prolonged exposure to direct sunlight when not in use

Lightweight Backpacking Tent, Ultralight Backpacking Tent, Ultralight Bivy Tent
Ultralight Single Person Camping Tent with Aluminum Poles for 3-Season Backpacking Waterproof DesignPrice range: $94.88 through $326.82 Select options This product has multiple variants. The options may be chosen on the product page
Lightweight Backpacking Tent, Ultralight Backpacking Tent, Waterproof Backpacking Tent
$391.05 Select options This product has multiple variants. The options may be chosen on the product page
Compact Backpacking Tent, Lightweight Backpacking Tent, Waterproof Camping Tent
$335.52 Select options This product has multiple variants. The options may be chosen on the product page
Ultralight Backpacking Tent, Ultralight Dome Tent, Winter Camping Tent
Price range: $369.63 through $370.07 Select options This product has multiple variants. The options may be chosen on the product page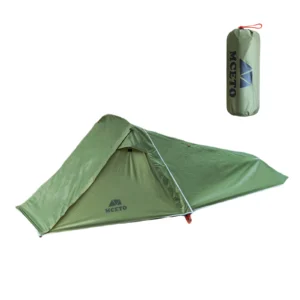
Backpacking Tent with Vestibule, Freestanding Backpacking Tent, Lightweight Backpacking Tent
Price range: $446.89 through $447.22 Select options This product has multiple variants. The options may be chosen on the product page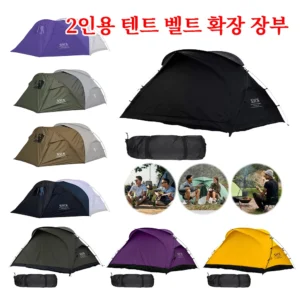
Backpacking Tent with Vestibule, Trekking Pole Backpacking Tent, Waterproof Camping Tent
Price range: $271.99 through $519.52 Select options This product has multiple variants. The options may be chosen on the product page
The ultralight materials used in most ultralight backpacking tents require more careful handling than traditional tents. Small tears should be addressed immediately with repair tape to prevent expansion. For significant damage, consult professional repair services.
Frequently Asked Questions About Trekking Pole Tent Setup
Can I use non-adjustable trekking poles with my tent?
Yes, but with limitations. You’ll need poles that match your tent’s required height. Some users place small objects under pole tips or dig small depressions to fine-tune height with fixed-length poles.
What if I forget my trekking poles or they break?
In emergency situations, you can substitute sturdy branches of appropriate length. Look for straight, strong branches and smooth any protrusions that might damage your tent fabric.
How do I set up on wooden platforms or solid surfaces?
Use specialized freestanding adapters if available for your model. Alternatively, secure guylines to platform edges, use heavy objects as anchors, or carry specific platform-compatible anchors like door stops or clamps.
Are trekking pole tents suitable for extreme weather conditions?
Many designs perform exceptionally well in challenging conditions when properly pitched. Focus on extra guylines, proper site selection, and weather-specific setup techniques.
Can I partially pitch my trekking pole tent for shade or quick shelter?
Many models allow for “fast fly” or partial setups using just the outer fly and poles. This creates a lightweight sun shade or rain shelter when you don’t need full enclosure.
How do setup techniques vary between different tent brands and models?
While general principles remain similar, specific pole placement, tensioning systems, and stake points vary significantly. Always review manufacturer instructions for your specific model. When choosing the ultimate compact shelter for two, consider how setup complexity aligns with your experience level.