

Why Efficient Tent Packing Matters for Two-Person Hiking
When you’re miles from civilization with everything you need on your back, how you pack your tent can make or break your outdoor experience. For two hikers sharing a shelter, efficient tent packing isn’t just about convenience—it’s essential for comfort and enjoyment.
Proper tent packing offers significant benefits for two-person adventures:
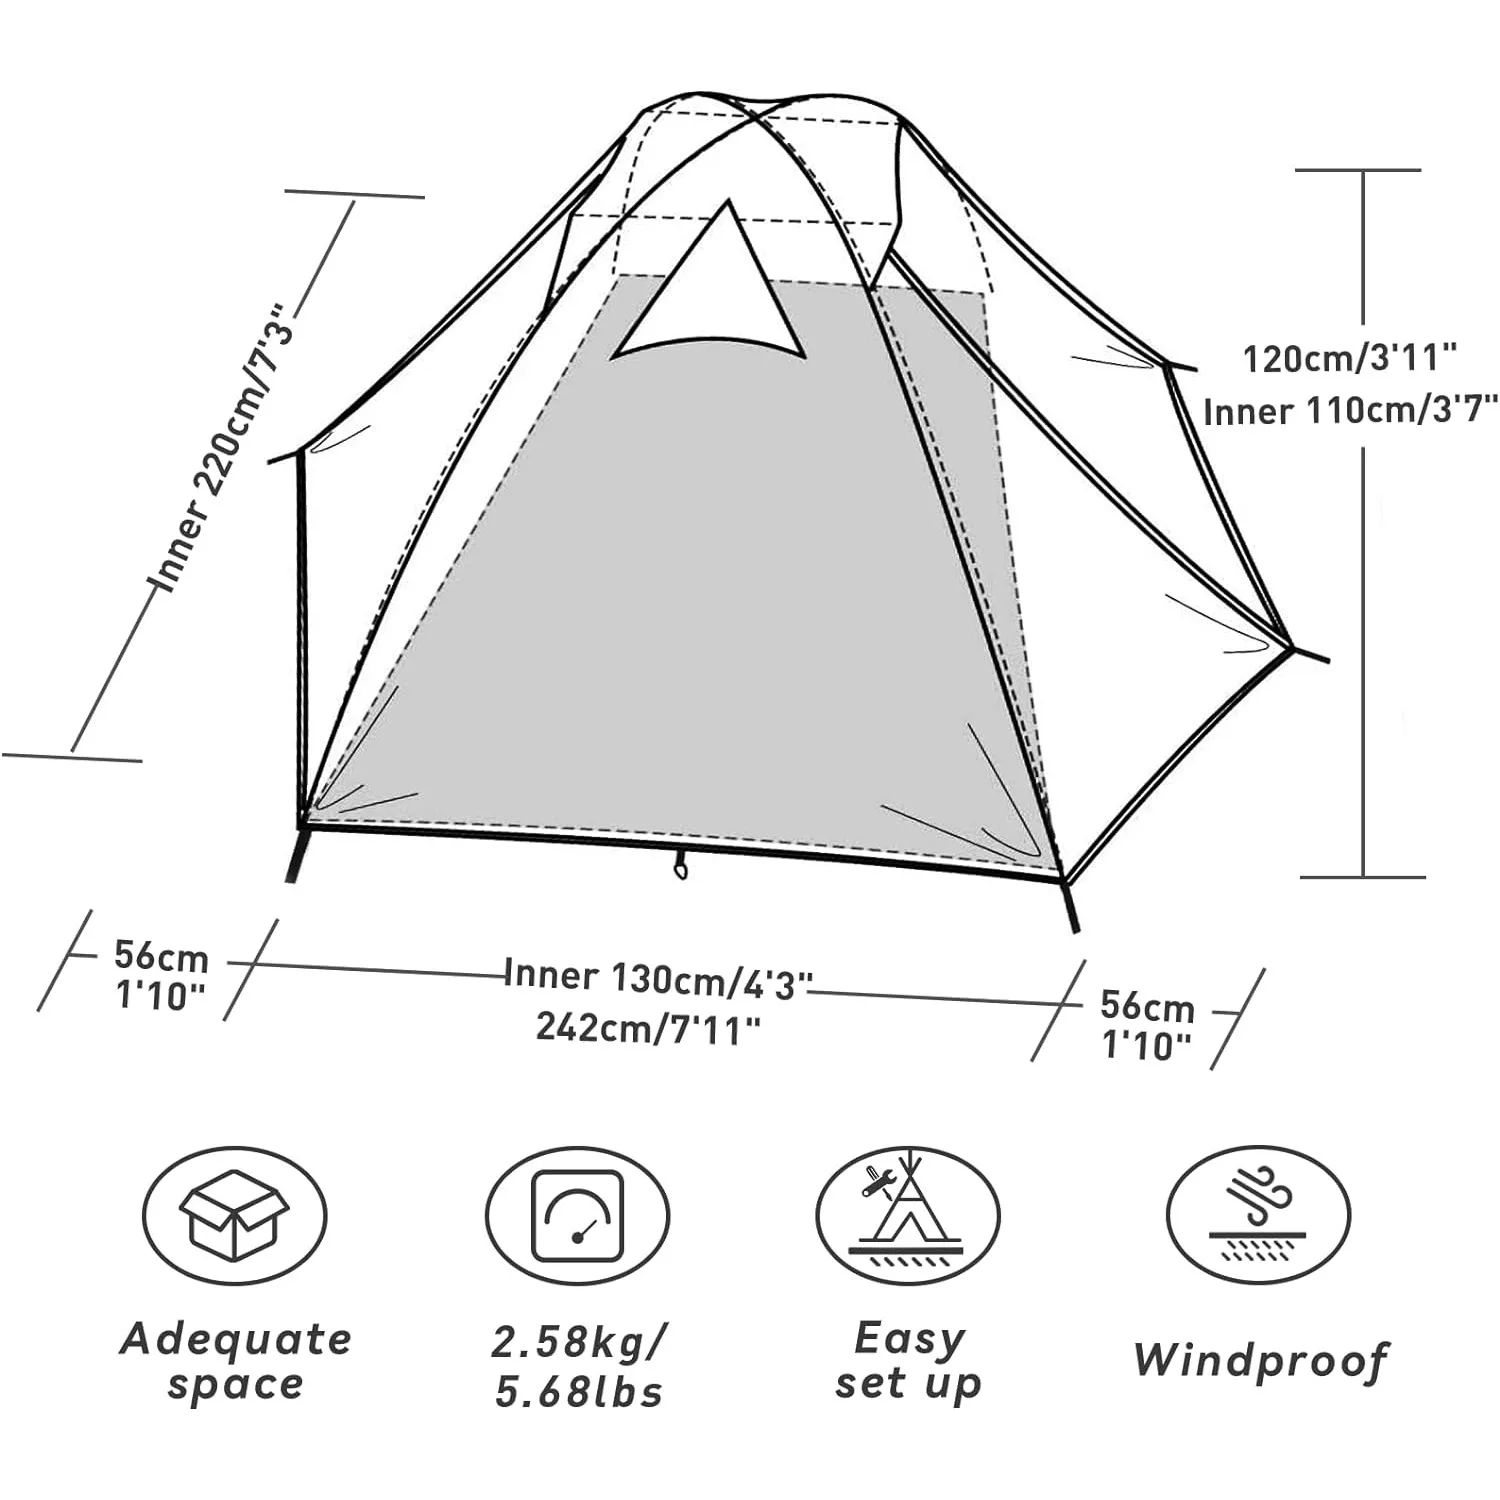
- Balanced weight distribution: With a typical two-person tent weighing 4-7 pounds (roughly 15-20% of recommended backpack weight), how you distribute this load affects your hiking comfort
- Maximized backpack space: When two people need to carry food, water, clothing, and other essentials, every cubic inch of pack space matters
- Investment protection: Quality compact shelters for two campers often represent a significant investment, and proper packing extends their lifespan
- Reduced camp setup time: Arriving at your destination tired after a long hike? Well-packed tents set up faster, getting you to relaxation sooner
- Enhanced trip enjoyment: Less struggle with gear means more energy to enjoy the surroundings
The techniques we’ll explore here aren’t just theoretical—they’re field-tested approaches that transform frustrating tent-wrangling sessions into smooth, efficient systems that get you on (and off) the trail with minimal hassle.
Essential Pre-Packing Preparation Steps
Before you stuff or roll your tent, these preparation steps ensure long-term protection of your shelter while making the actual packing process smoother:
1. Clean thoroughly
- Remove all dirt, sand, and debris (especially from zippers and pole joints)
- For silnylon tents: use gentle soap with minimal scrubbing to preserve waterproof coating
- For polyester tents: mild soap is fine, focus on removing tree sap or stubborn dirt
2. Ensure complete dryness
- Moisture trapped in packed tents leads to mold, mildew, and degraded waterproofing
- Set up tent in sunlight for 15-30 minutes if possible, or hang components separately
- Pay special attention to seams and corners where moisture hides
3. Close all zippers
- Prevents snags during packing
- Maintains proper tension across fabric panels
- Reduces stress points when compressed
4. Verify all components
- Count stakes, poles, and guy lines before packing
- Inspect for damage that might need field repair
- Group components logically for the two-person lightweight tent setup process
5. Organize strategically
- Separate poles and stakes from fabric components
- Consider which components will be packed in which backpack
- Identify any wet elements that need special handling
Taking these preliminary steps turns the actual packing from a frustrating chore into a simple process, while significantly extending the life of your outdoor home.
The Roll Method: Maximizing Organization and Protection
The roll method remains a favorite among experienced backpackers for good reason—it offers exceptional organization and protection for your tent components. This technique works particularly well for two-person tents with their larger fabric panels.
Step-by-Step Rolling Process
- Lay out the tent body flat on a clean, dry surface with the door facing up and zipped closed
- Fold the tent sides inward to create a rectangle approximately the width of your tent pole bag (usually 16-20 inches)
- Place the pole bag at one end of the folded tent body (typically the end opposite the door)
- Flatten and smooth the rainfly, then lay it on top of the folded tent body
- Begin rolling tightly from the pole bag end, pressing out air as you go
- Keep tension even across the entire width to prevent a cone shape
- Secure the rolled tent using the attached straps or extra cordage
This method offers significant benefits for two-person shelters compared to smaller tents. The larger fabric panels of 2-person tents roll more evenly, creating a more uniform package that fits efficiently in your pack.
For dome-style two-person tents, folding tent corners to the center before rolling can create an even more compact package. For tunnel or rectangular tents, straight folds work better for an optimal roll.
The roll method excels at protecting tent materials because it:
– Minimizes random creases that can stress fabric over time
– Creates predictable fold patterns that align with tent construction
– Keeps poles protected in the center of the bundle
– Makes it easier to spot missing components before leaving camp
When executed properly, a rolled tent maintains its shape and provides a predictable, easy-to-pack cylinder that fits neatly in your backpack or attached securely to the outside.
The Stuff Method: Optimizing Speed and Flexibility
While rolling has its merits, the stuff method offers compelling advantages for many backpackers, especially in certain situations. This approach prioritizes speed and adaptability over perfect organization.
How to Stuff Effectively
- Hold the stuff sack open with both hands, creating a wide opening
- Push the tent body into the sack in random folds, working from the center of the fabric
- Add the rainfly next, using the same technique of pushing rather than folding
- Work around the circumference of the stuff sack to fill all available space
- Compress gradually from multiple angles rather than forcing from one direction
- Add poles and stakes last (or pack separately for better weight distribution)
When to Choose Stuffing Over Rolling
The stuff method shines in several scenarios:
– When packing a wet tent (prevents trapping moisture in consistent folds)
– During inclement weather when speed matters
– For tents with more flexible, less crease-prone materials
– When your priority is getting on the trail quickly
Many backpackers who use lightweight backpacking tents prefer stuffing because these shelters often use advanced fabrics that resist permanent creasing. Contrary to some beliefs, modern tent materials often handle random stuffing better than repeated folding along the same lines, which can create permanent weak points in waterproof coatings.
To minimize volume when stuffing:
– Push fabric into corners of the stuff sack first
– Use short, quick stuffing motions rather than large bunches
– Compress from the bottom while adding more material at the top
– Consider using an aftermarket compression sack
The key advantage of stuffing is its balance of speed and fabric care—perfect for the realities of changing weather and tight schedules on the trail.
Weight Distribution: Smart Load-Sharing Between Two Hikers
One of the primary advantages of hiking as a pair is the ability to split tent components between two packs. Strategic distribution not only lightens individual loads but optimizes available space in each backpack.
Common Distribution Approaches
Weight-Balanced Distribution:
– Person 1: Tent body and rainfly (softer, more flexible items)
– Person 2: Poles, stakes, and guy lines (rigid, denser items)
Volume-Balanced Distribution:
– Person 1: Tent body and stakes (mixed weight/volume)
– Person 2: Rainfly and poles (mixed weight/volume)
Specialized Distribution:
– Stronger Hiker: Takes heavier components
– Person with Larger Pack: Takes bulkier components
Component Weight Comparison
Here’s a breakdown of typical component weights for popular 2-person backpacking tents:
| Component | Average Weight | Percentage of Total |
|---|---|---|
| Tent Body | 1.5-2.5 lbs | 35-40% |
| Rainfly | 1.0-1.8 lbs | 25-30% |
| Poles | 0.8-1.5 lbs | 20-25% |
| Stakes/Guy Lines | 0.3-0.5 lbs | 5-10% |
Communication Strategies
Regardless of how you distribute components, establish these agreements before hitting the trail:
– Who sets up which parts first
– Where to meet if separated before camp
– Backup plan if one person arrives significantly earlier
– How to handle wet components (who carries them)
Effective distribution makes immediate sense on the trail—each hiker carries noticeably less weight than if carrying a complete shelter, while the combined carrying capacity of two packs allows for more comfort items than solo trips.
Strategic Placement: Where to Pack Your Tent Components
Where you position tent components within your backpack dramatically affects hiking comfort and stability. The best placement depends on component type, terrain, and your overall packing system.
Ideal Positioning for Fabric Components
For tent bodies and rainflies:
– Middle-back position in your pack, against your spine
– Surrounded by softer items like clothing
– Away from sharp objects that could cause tears
– Not at the very bottom (to avoid compression and for easier access)
This central placement supports proper weight distribution—keeping the heaviest items centered and close to your back helps maintain your center of gravity and reduces strain.
Pole and Stake Placement Options
Tent poles present unique packing challenges due to their length and rigidity:
– Internal vertical placement: Along the inside edge of your pack, parallel to your back
– External attachment: Secured horizontally under the top lid or vertically along pack sides
– Split between packs: For collapsible poles that break down into very short sections
Stakes are best packed:
– In a dedicated stake bag
– In an external pocket for quick access
– Away from water reservoirs or electronics
For those using compact backpacking tents, the pole sections are typically shorter, allowing for more flexible packing options inside the main compartment.
Adaptations for Different Terrain
- Technical terrain: Pack tent lower for better stability when balance is critical
- Wet environments: Keep tent more accessible for quick deployment during rain
- Extended trips: Prioritize comfort over tent accessibility
Strategic tent placement contributes to a more comfortable hiking experience, reduced pack sway, and better overall balance on varied terrain. The effort spent organizing this critical item pays dividends over long trail days.
Compression Techniques for Minimal Volume
Even the most efficiently packed tent can be further reduced in size through proper compression techniques. When every cubic inch in your pack matters, these approaches can create significant space savings.
Compression Options
Dedicated compression sacks
– Offer 25-40% volume reduction over standard stuff sacks
– Feature multiple compression straps that cinch from different angles
– Best for bulky synthetic tentsCompression straps
– Can be used directly on rolled tents without a stuff sack
– Allow custom tension adjustment
– Ideal for attaching tents to pack exteriorsVacuum compression
– Rolling while manually forcing air out
– Creates the smallest possible package
– Works best with nylon and polyester tents
For owners of ultralight backpacking tents, be especially careful with compression. These specialized materials (often Dyneema or ultra-thin silnylon) can develop stress points if over-compressed.
Compression Limitations
While reducing volume is beneficial, there are important boundaries:
– Over-compression can damage waterproof coatings
– Extremely tight packing increases setup time as fabrics need to “relax”
– Some ultralight materials shouldn’t be compressed beyond their included stuff sack size
– Super-compressed tents take longer to dry out if damp
The sweet spot is compressing enough to maximize pack space without stressing materials beyond their design limits—typically reducing volume by about one-third from a loosely packed state.
Managing a Wet Tent Between Two Backpacks
Packing a wet tent presents unique challenges, but with two hikers sharing the load, you have more options for minimizing the impact of moisture.
The Wet Tent Challenge
A rain-soaked tent can weigh 30-50% more than its dry weight and poses risks to other gear. When you must pack a wet tent, these strategies help mitigate the problems:
Separation Strategy:
– Pack tent body and rainfly separately to distribute wet weight
– Place wet components in exterior mesh pockets where available
– Use dedicated waterproof stuff sacks for wet components
Protection Priorities:
– Use pack liners or dry bags to isolate wet tent from dry gear
– Pack sleeping bags with extra protection from moisture transfer
– Consider garbage bags as temporary moisture barriers
Distribution Approach:
– Person with more waterproof pack organization takes wetter components
– Split outer rainfly and inner tent body between packs
– One person carries wet rainfly externally while the other carries dry tent body internally
For hikers using waterproof backpacking tents, the fabric may shed water more effectively during shaking/drying attempts before packing, but still requires careful moisture management.

Lightweight Backpacking Tent, Ultralight Backpacking Tent, Ultralight Bivy Tent
Ultralight Single Person Camping Tent with Aluminum Poles for 3-Season Backpacking Waterproof DesignPrice range: $94.88 through $326.82 Select options This product has multiple variants. The options may be chosen on the product page
Lightweight Backpacking Tent, Ultralight Backpacking Tent, Waterproof Backpacking Tent
$391.05 Select options This product has multiple variants. The options may be chosen on the product page
Compact Backpacking Tent, Lightweight Backpacking Tent, Waterproof Camping Tent
$335.52 Select options This product has multiple variants. The options may be chosen on the product page
Ultralight Backpacking Tent, Ultralight Dome Tent, Winter Camping Tent
Price range: $369.63 through $370.07 Select options This product has multiple variants. The options may be chosen on the product page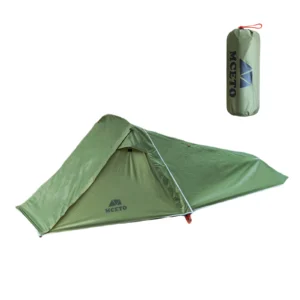
Backpacking Tent with Vestibule, Freestanding Backpacking Tent, Lightweight Backpacking Tent
Price range: $446.89 through $447.22 Select options This product has multiple variants. The options may be chosen on the product page
Backpacking Tent with Vestibule, Trekking Pole Backpacking Tent, Waterproof Camping Tent
Price range: $271.99 through $519.52 Select options This product has multiple variants. The options may be chosen on the product page
When to Delay for Drying
Sometimes waiting is worth it:
– When morning sun could dry a tent in 20-30 minutes
– When continuing with a soaked tent would create bigger problems later
– When extended wet storage (over 24 hours) could promote mildew
Remember that managing condensation (interior moisture) differs from managing rain-soaked tents. Condensation can often be wiped away with a small pack towel before packing, while thoroughly soaked fabrics require more comprehensive strategies.
Quick-Access Setup: Packing for Efficient Camp Arrival
Arriving at your destination tired after a long day’s hike is when thoughtful tent packing truly pays off. Strategic organization enables rapid shelter deployment when you need it most.
The Logical Access Sequence
Pack your tent components in the reverse order of how you’ll need them:
1. Tent body/rainfly (needed last) packed deepest
2. Stakes (needed second) packed more accessibly
3. Poles (needed first) packed most accessibly or externally
Coordination Tips for Two-Person Setup
Establish clear roles before arrival:
– Person A handles poles and basic structure
– Person B prepares stakes and unpackages tent body
– Both work together for rainfly placementCreate a consistent system:
– Use the same setup sequence every time
– Place backpacks in the same relative positions at each campsite
– Develop simple verbal cues for coordinationAdapt to arrival conditions:
– Have a “rain arrival” plan with modified roles for faster rainfly deployment
– Adjust your standard sequence for high wind conditions
– Create a simplified setup for emergency or night arrivals
With practice, two coordinated hikers using a well-packed tent can set up a compact shelter for two in under 3-5 minutes—critical when weather turns suddenly or daylight is fading.
Strategic packing with setup in mind typically saves 2-5 minutes of camp setup time—not insignificant when you’re cold, hungry, or racing approaching weather.
Can Different Tent Brands Affect Packing Techniques?
Different tent designs absolutely require adaptations to your packing approach. Understanding your specific shelter’s architecture helps optimize how you prepare and pack it.
Design-Specific Packing Considerations
Dome Tents:
– Multiple crossing poles create natural folding lines
– Often benefit from folding in thirds before rolling
– Pole sections tend to be shorter and pack more easily
Tunnel Tents:
– Long, parallel poles may need to be packed separately
– Rectangular footprint works well with the roll method
– Often have less complex folding patterns
Semi-Freestanding Tents:
– Hybrid pole structures may require unique folding patterns
– Often use lighter materials requiring gentler compression
– May have integrated pole sleeves that create natural fold lines
The primary difference in packing freestanding vs. staked hiking shelters is that non-freestanding designs typically have fewer rigid components and more irregular shapes, requiring more attention to folding patterns.
Material Considerations
Beyond design, materials significantly influence optimal packing:
– Silnylon tents prefer gentle stuffing over tight rolling
– Polyester tents handle repeated folding patterns better
– Ultralight DCF (Dyneema) tents should avoid tight creasing
While universal packing principles apply across brands, the most efficient approach will always be somewhat tent-specific. Experiment with different methods during at-home practice sessions to find what works best for your particular shelter.
Should You Replace Your Tent’s Stuff Sack?
The stuff sack included with your tent is often a compromise between cost and function. Replacing it with an aftermarket option can significantly improve your packing experience.
Benefits of Aftermarket Stuff Sacks
- Better Compression: Dedicated compression sacks can reduce volume by up to 40%
- Improved Materials: More durable fabrics withstand repeated compression
- Customized Size: Slightly larger sacks make packing easier while still allowing compression
- Enhanced Organization: Color coding or clear panels help identify contents
- Better Weather Resistance: Higher quality waterproofing for wet conditions
Making the Replacement Decision
Consider upgrading when:
– Your tent is high-quality but came with a basic stuff sack
– You frequently pack in challenging conditions (rain, cold hands)
– Pack space is at a premium on your trips
– The original sack is showing signs of wear
Stick with the original when:
– The manufacturer specifically warns against compression
– Your tent features extremely delicate materials
– You rarely need to minimize pack volume
For those looking to optimize without purchasing specialty gear, DIY alternatives include using compression straps around the original sack or adopting vacuum-packing techniques that gradually squeeze air out during rolling.
The most effective aftermarket options for two-person tents reduce packed volume by 25-35% compared to standard stuff sacks, potentially freeing up 1-2 liters of valuable pack space for other essentials.
Do Professional Backpackers Pack Differently?
Experienced thru-hikers and expedition leaders often develop sophisticated packing techniques that balance efficiency, protection, and adaptability. These approaches evolve from thousands of trail miles and countless pack/unpack cycles.
Advanced Techniques from the Experts
Professional backpackers often:
– Eliminate stuff sacks entirely for tents under 3 lbs, instead using the tent as a pack liner
– Separate components by weather risk, keeping critical items in multiple waterproof barriers
– Prioritize morning efficiency over evening organization, packing for fastest possible morning departure
– Adapt packing style to terrain, using different approaches for desert, alpine, or forest environments
– Develop modular systems that work across different shelter types as they upgrade gear
For multi-week trips, priorities shift toward systems that protect gear longevity while maintaining daily efficiency. Many experienced backpackers find that slightly looser packing actually saves time over the duration of longer trips.
One innovative technique used by veterans is the “tent body liner” approach—using your tent body as a waterproof liner for your entire pack, then packing everything inside it before rolling the top closed. This serves double-duty, protecting gear while eliminating a separate stuff sack.
For those looking to upgrade their gear based on packing considerations, exploring various camping shelter options for two can reveal designs specifically engineered for packing efficiency.
Whatever techniques you adopt, remember that efficient tent packing is a skill developed through practice. Each trip provides an opportunity to refine your system until packing becomes second nature—letting you focus on the experiences that matter rather than wrestling with your gear.